Using WAGMI with Milkomeda
Milkomeda C1 Sidechain is fully operational on Mainnet, which means that it is currently deployed and connected to production version of the Cardano blockchain.
Compared to a typical web2 application where the backend code is executed on centralized servers, a DApp (Decentralized Application) runs its backend code on a blockchain. The frontend code and user interfaces of a DApp can be written in any language and deployed on any server or servers to interact with the backend logic.
This article will guide you through the process of developing a simple Storage smart contract, deploying it on Milkomeda C1 Devnet, and accessing it using a frontend built with React, Wagmi, and Rainbowkit.
You can choose to follow allong completing the coding steps or download the full code for this tutorial by running:
npx degit dcspark/milkomeda-guides#wagmi_c1 guide-wagmi-c1
Our first step is to write the Smart Contract in Solidity.
Create and Deploy the Smart Contract
// SPDX-License-Identifier: MIT
pragma solidity ^0.8.0;

contract Storage {
    uint256 private value;
    event ValueChanged(uint256 newValue);

    constructor() {}

    function retrieve() public view returns (uint256) {
        return value;
    }

    function store(uint256 newValue) public {
        value = newValue;
        emit ValueChanged(newValue);
    }

}
Our smart contract couldn’t be more simple. We define a private variable of type uint256 named value and define its respective getter (retrieve) and setter (store) functions.
To compile and deploy our smart contract, we will use Hardhat by following the steps below:
- Initialize a Hardhat project in an empty folder:
yarn init
yarn add --dev hardhat
- Bootstrap the project by running the following command and choosing javascript:
npx hardhat
- Create a file named SimpleStorage.sol in the contracts folder, containing the code above.
- Compile the contract:
npx hardhat compile
- Edit hardhat.config.js to add the C1 Devnet and your funded test account. Refer to the Milkomeda docs for information on how to get devnet funds.
require("@nomicfoundation/hardhat-toolbox");
require("dotenv").config();

/** @type import('hardhat/config').HardhatUserConfig */
module.exports = {
  solidity: "0.8.17",
  networks: {
    c1_testnet: {
      url: `https://rpc-devnet-cardano-evm.c1.milkomeda.com`,
      accounts: [`0x${process.env.PRIVATE_KEY}`]
    }
  }
};
- Replace the contents of deploy.js in the scripts folder:
const hre = require("hardhat");

async function main() {
    const Storage = await hre.ethers.getContractFactory("Storage");
    const storage = await Storage.deploy();
    await storage.deployed();
    console.log(`Storage contract deployed to ${storage.address}`);
}

main().catch((error) => {
    console.error(error);
    process.exitCode = 1;
});
- Run the deployment script on C1 Devnet:
npx hardhat run scripts/deploy.js --network c1_testnet
After a successful deployment, you should see an output containing the address of the deployed contract. With this completed, we can proceed to create a frontend interface to interact with the contract.
Create Frontend
We will use the recommended create-wagmi command line interface to set up a new wagmi app using TypeScript and install the required dependencies:
yarn create wagmi
(Choose Vite (React), then Rainbowkit and Public RPC)
Enter the created folder, run yarn dev and you will get a link to open the development site in your browser.
By default, only Ethereum mainnet will be available so let’s change that to add Milkomeda C1 Devnet. Create a file named milkomeda.ts in the folder, with the following:
const milkomedaC1Testnet = {
    id: 200_101,
    name: 'Milkomeda C1 Testnet',
    network: 'milkomedac1test',
    iconUrl: 'https://dcspark.github.io/milkomeda-documentation/img/favicon.svg',
    iconBackground: '#000',
    nativeCurrency: {
      decimals: 18,
      name: 'mTADA',
      symbol: 'mTADA',
    },
    rpcUrls: {
      default: {
        http: ['https://rpc-devnet-cardano-evm.c1.milkomeda.com'],
      },
    },
    blockExplorers: {
      default: { name: 'BlockScout', url: 'https://explorer-devnet-cardano-evm.c1.milkomeda.com' },
    },
    testnet: true,
};


export { milkomedaC1Testnet }
Now let’s add it to the file wagmi.ts by importing the new defined chain and changing the configureChains call to:
import { milkomedaC1Testnet } from './milkomeda'

const { chains, provider, webSocketProvider } = configureChains(
  [mainnet, milkomedaC1Testnet, ],
  [
    publicProvider(),
  ],
)
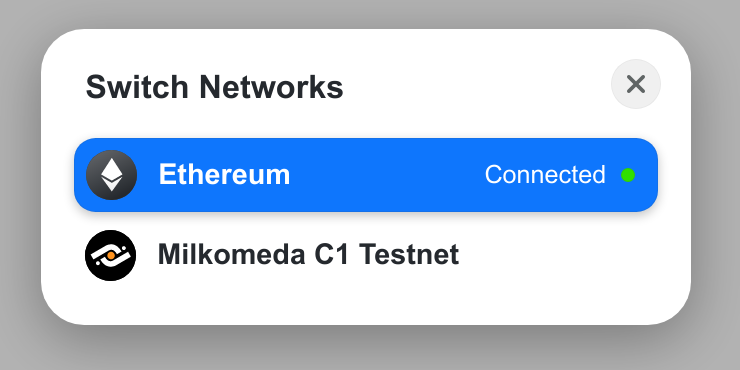
By connecting our account through Metamask, we should now be able to see a chain selector within the connect button.

By clicking on the chain, we will now be able to choose Milkomeda C1 Devnet.
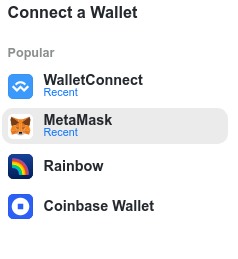
Apart from Metamask, we can also connect through WalletConnect. By default, Rainbow and Coinbase wallet will also be available, but it is possible to disable or specify a custom list.
While not necessary, we can edit the App.tsx file to remove the Account component as the ENS elements it contains are only relevant for the Ethereum mainnet.
Now let’s connect to the Smart Contract to read and write to the value variable. We’ll create a new file named Storage.tsx in the components folder and add the following:
import { useContractRead } from 'wagmi'
import StorageInfo from '../../../artifacts/contracts/SimpleStorage.sol/Storage.json'

function Storage() {
    const CONTRACT_ADDRESS = "0x32273C07E64a134D05b5Ec5e794c91bC7498Ff8f"

    const { data } = useContractRead({
        address: CONTRACT_ADDRESS,
        abi: StorageInfo.abi,
        functionName: 'retrieve',
        watch: true
      })

  return (
    <>
    <div>Storage Value: {data?.toString()}</div>
    </>
  )
}

export default Storage
In this section, we are referencing the JSON file that was generated by Hardhat during the Smart Contract compilation. This file contains the ABI, and you may need to enable esModuleInterop in your tsconfig.json file. Additionally, we have hard-coded the address of the deployed contract. The most important aspect is that we are using the useContractRead Wagmi hook to retrieve the value from the retrieve function within the contract.
Next, we will include hooks that allow us to modify the value in the Smart Contract. To accomplish this, we will use the usePrepareContractWrite and useContractWrite hooks, and create an input and button to send a new value to the setter function.
After adding to the imports:
import { useContractRead, usePrepareContractWrite, useContractWrite } from 'wagmi'
import { useState } from "react";
We will add the following to the Storage component function:
    const [inputValue, setInputValue] = useState("0")

    const { config } = usePrepareContractWrite({
        address: CONTRACT_ADDRESS,
        abi: StorageInfo.abi,
        args: [inputValue],
        functionName: 'store',
      })

    const { write } = useContractWrite(config)
Then add the html elements:
        <input value={inputValue}
            onChange={(event) => {
                setInputValue(event.target.value)
            }}/>
        <button disabled={!write} onClick={() => write?.()}>Store</button>
Finally, add the newly created component to the App.tsx file:
(...)
import Storage from './components/Storage'
(...)
      <ConnectButton />
      <Storage />
(...)
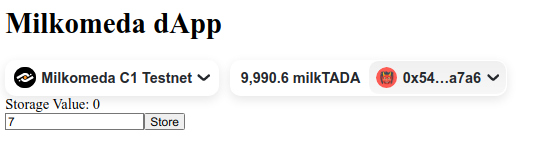
We can now modify the value in the input box, click the button, and will be prompted to sign the transaction to write the new value to the Smart Contract. As the watch option in the useContractRead hook is set to true, the value will automatically update.
With that, we now have a fully functional dApp that connects to the Milkomeda C1 Devnet, can read from our Smart Contract, and is also capable of writing to it.
This guide provided a step-by-step explanation of how to develop a basic Storage Smart Contract and deploy it on the Milkomeda C1 Devnet using Hardhat. It also outlined how to create a frontend that interfaces with the contract, utilizing React, Wagmi, and Rainbowkit.