For Users
Up until now, users who wanted to interact with Dapps on Layer 2 had to undergo a somewhat cumbersome process of moving their assets from Layer 1. This migration process to a Layer 2 chain often involves bridging or wrapping assets from Layer 1 to facilitate interactions with smart contracts on Layer 2. However, this process can be complex, involving multiple steps across different interfaces and requiring more than one wallet.
Milkomeda's Wrapped Smart Contracts (WSC) present an elegant solution that not only streamlines the user experience by eliminating the need for multiple wallets but also provides a unified interaction flow between Layer 1 and Layer 2.
How Wrapped Smart Contracts Work
Externally Owned Accounts (EOAs) and Smart Contracts are both key components of EVM blockchains, but they serve different purposes. An EOA is managed by an individual or an entity, is controlled with a private key, and is the only type of account that can initiate transactions on EVM chains. Smart contracts can run code to execute functions based on predefined conditions and enable decentralized applications (dApps), but also share some features of EOAs like the ability receive and store crypto and tokens.
The concept of account abstraction aims to enhance the user experience by blurring the distinction between EOAs and Smart Contracts, among other benefits, to improve the platform's flexibility.
Wrapped Smart Contracts (WSC) leverage the concept of account abstraction to enhance the user experience when interacting with Layer 2 while remaining within the safety of Layer 1.
When using WSC, a smart contract is deployed on Milkomeda's Layer 2, bound to the user's specific Layer 1 address and serves as an account abstraction, possessing a balance, a nonce, and the ability to execute signed transactions on behalf of the user.
Users can connect to DApps that support WSC using their Cardano wallets, which will generate an EVM address for them. Unlike an Externally Owned Account (EOA), this address doesn't require users to manage private keys. Instead, users can create transactions on Layer 2 and sign them using their Layer 1 account.
User Guide for EVM dApp Interaction
To demonstrate the seamless interaction between Layer 1 and Layer 2, we'll walk through the steps of buying and selling ReserveCoin from the Djed Protocol on Milkomeda's Layer 2 using WSC.
- Start EVM dApp Interaction: Begin by accessing the EVM dApp through your preferred web browser or application. Ensure that you have an active connection to the main blockchain network.
- Performing Actions: Within the EVM dApp, you'll find various actions and functionalities to explore. Engage with the dApp's interface and choose the action you want to perform. It could be anything from purchasing an in-game item to participating in a decentralized finance (DeFi) transaction.
- Transaction Request: Once you select an action, the EVM dApp will prompt you to confirm the transaction. This confirmation step ensures you're aware of the action's details and the associated costs (gas fees).
- Proxy Deployment: Upon confirming the transaction, the EVM dApp will deploy a special smart contract called the "Proxy" on the sidechain. This Proxy represents your intent to carry out the chosen action.
- Sidechain Execution: The Proxy smart contract interacts with the appropriate smart contract deployed on the sidechain to execute your desired action. The sidechain provides faster and more cost-efficient processing compared to the main blockchain.
- Result Notification: After the execution is completed on the sidechain, the result is relayed back to the main blockchain. You will receive a notification or confirmation of the action's success within the EVM dApp.
- Updated User State: Your account's state on the main blockchain is updated based on the results of the sidechain execution. For example, if you bought an in-game item, the item will now be reflected in your inventory.
- Seamless Experience: Throughout the process, you stay on the main blockchain, making it a seamless and user-friendly experience. There's no need to switch between different platforms or networks.
- Transaction Fees: Keep in mind that every action on the blockchain incurs gas fees to cover the computational resources required for execution. These fees may vary depending on network congestion and complexity of the action. The EVM dApp will display the estimated gas fees before confirming the transaction.
- Security and Reliability: The EVM dApp ensures the security and reliability of your interactions by utilizing smart contracts and consensus mechanisms built into the blockchain technology.
Enjoy exploring the decentralized world of EVM dApps and leverage the efficiency of sidechain execution while staying connected to the main blockchain network!
Buying ReserveCoin (Djed Protocol)
The goal here will be to get the asset available on the Layer 2 (Milkomeda C1) in the Layer 1 (Cardano) wallet.
The user will connect to the Dapp using WSC, at which point a smart contract will be deployed when the connection is made for the first time, and the Layer 1 wallet will control this smart contract. After the connection is made, the user initiates the action (Buying) on the Dapps's frontend, to be presented with and interface that will guide him through the necessary steps to buy an asset on the L2 with funds from his wallet on the L1.
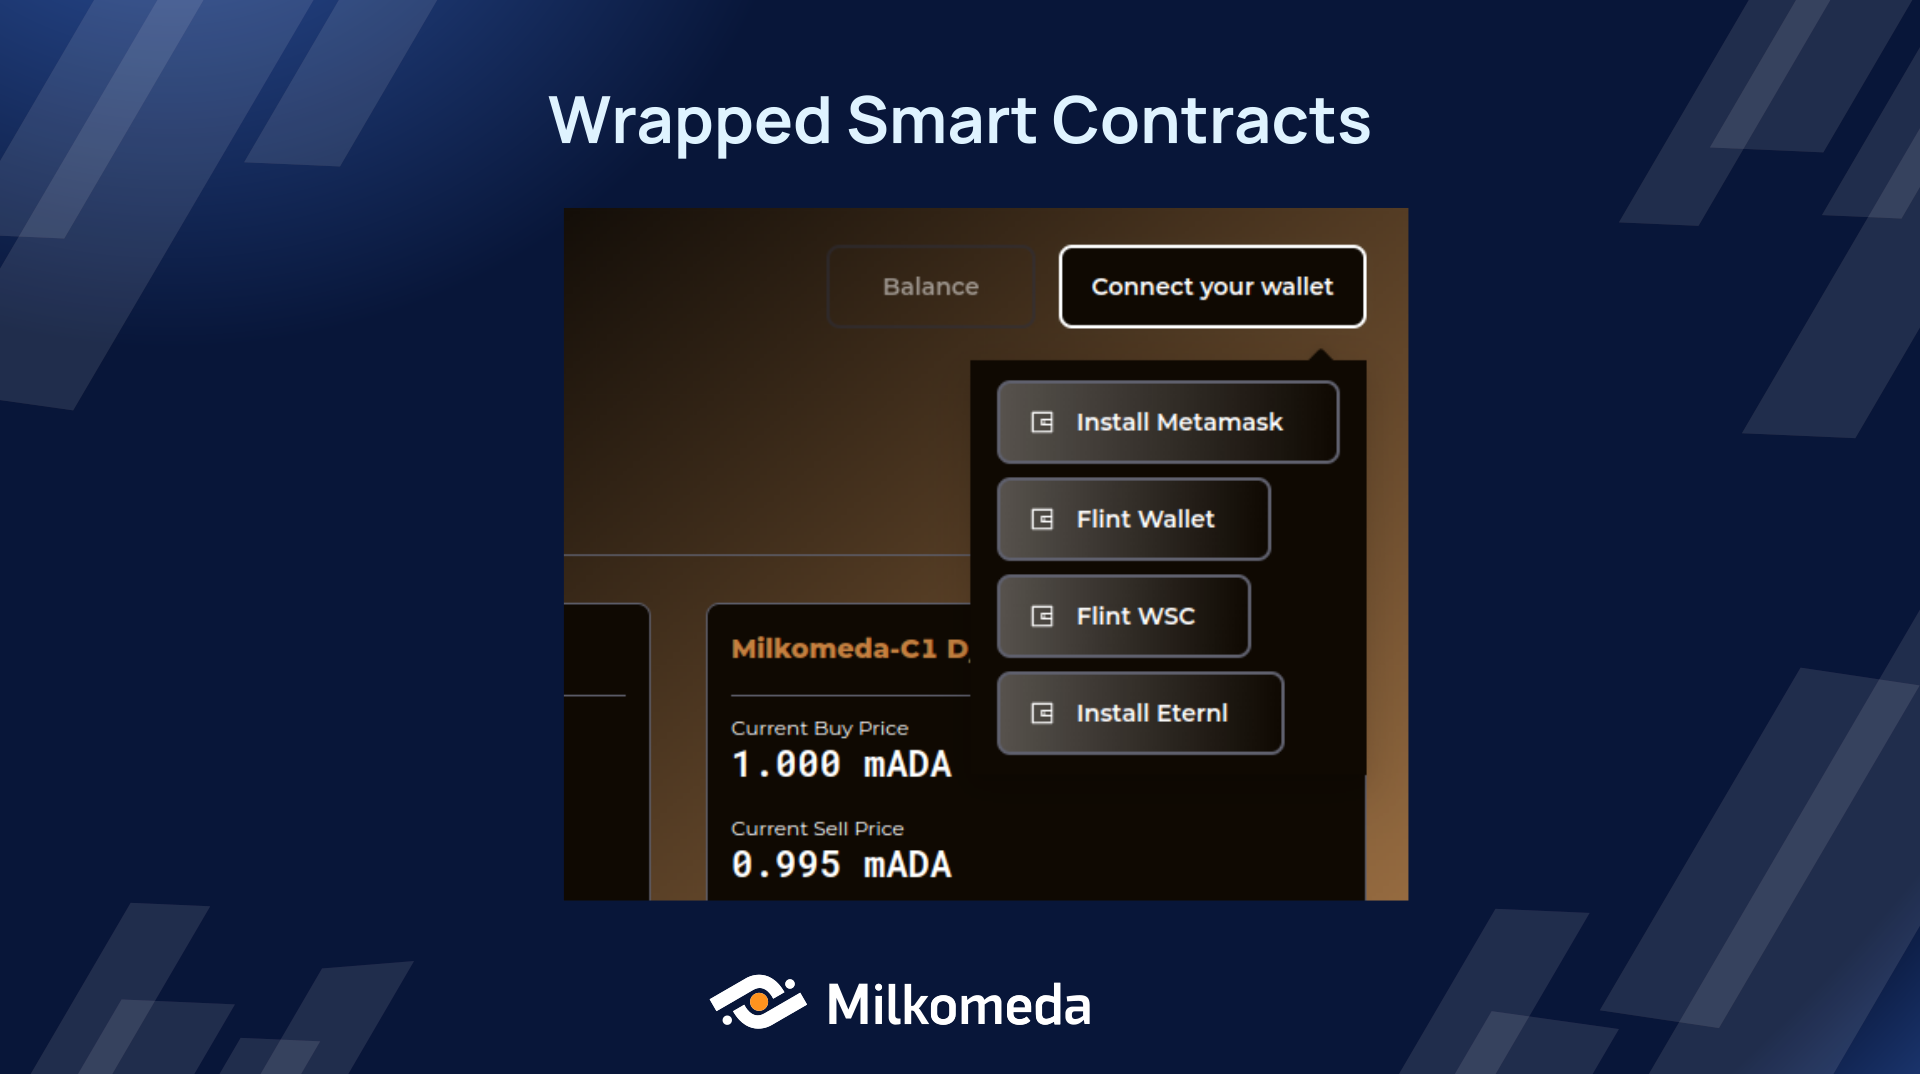
- Connecting the Wallet - Users can click "Connect your wallet" and choose "Flint WSC" to create a new address with the Wrapped Smart Contract, eliminating the need for multiple wallets.
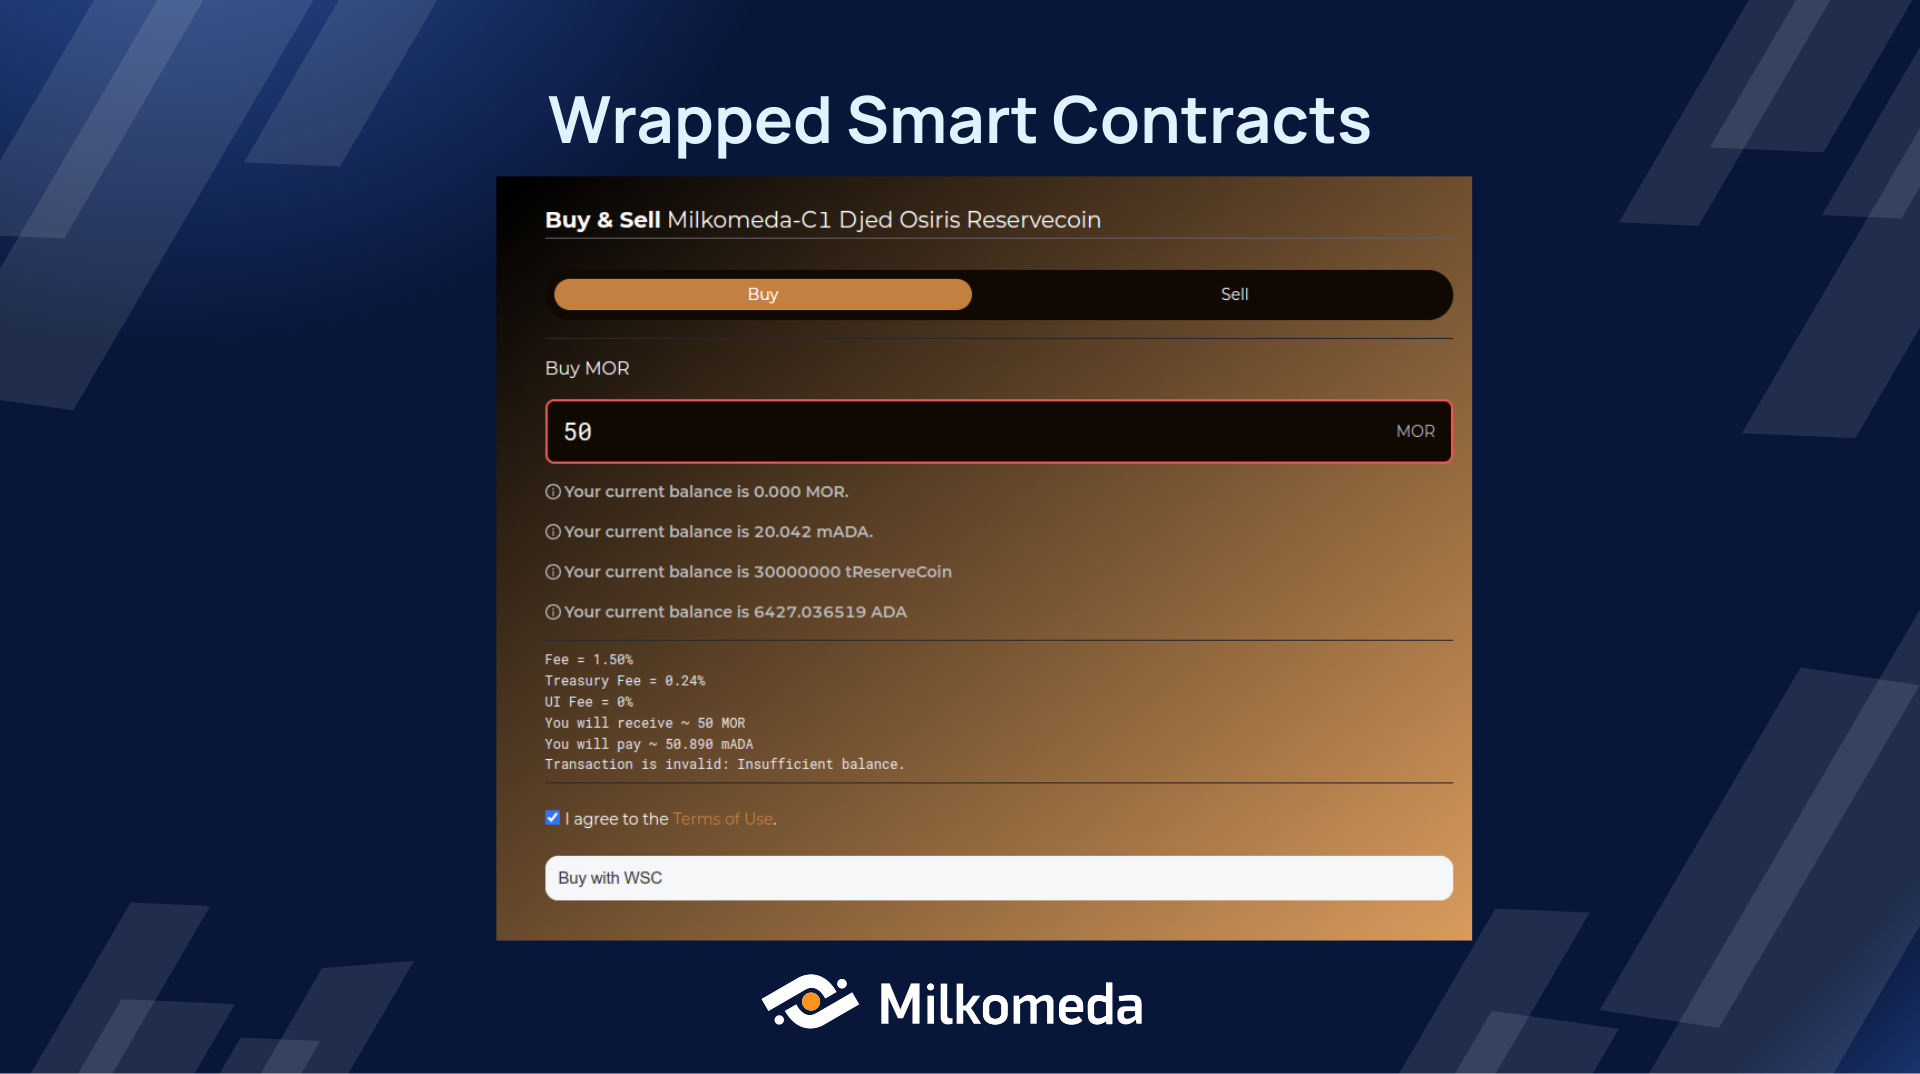
- Initiating the Action - After the wallet is connected, the user can initiate the interaction with the DApp as he normally would. In this case, one would select the required options ("Buy") and input the required amount an then press the "Buy with WSC" button.
- Confirming the Steps - The flow differs from using a traditional Layer 2 wallet since the WSC wallet initially has no funds on Layer 2. Users need to complete several interactions:
- Wrapping: Convert Layer 1 assets to Milkomeda assets to perform actions on Layer 2.
- Execute Action: Execute the desired action on Layer 2, in this case, buying Djed ReserveCoin.
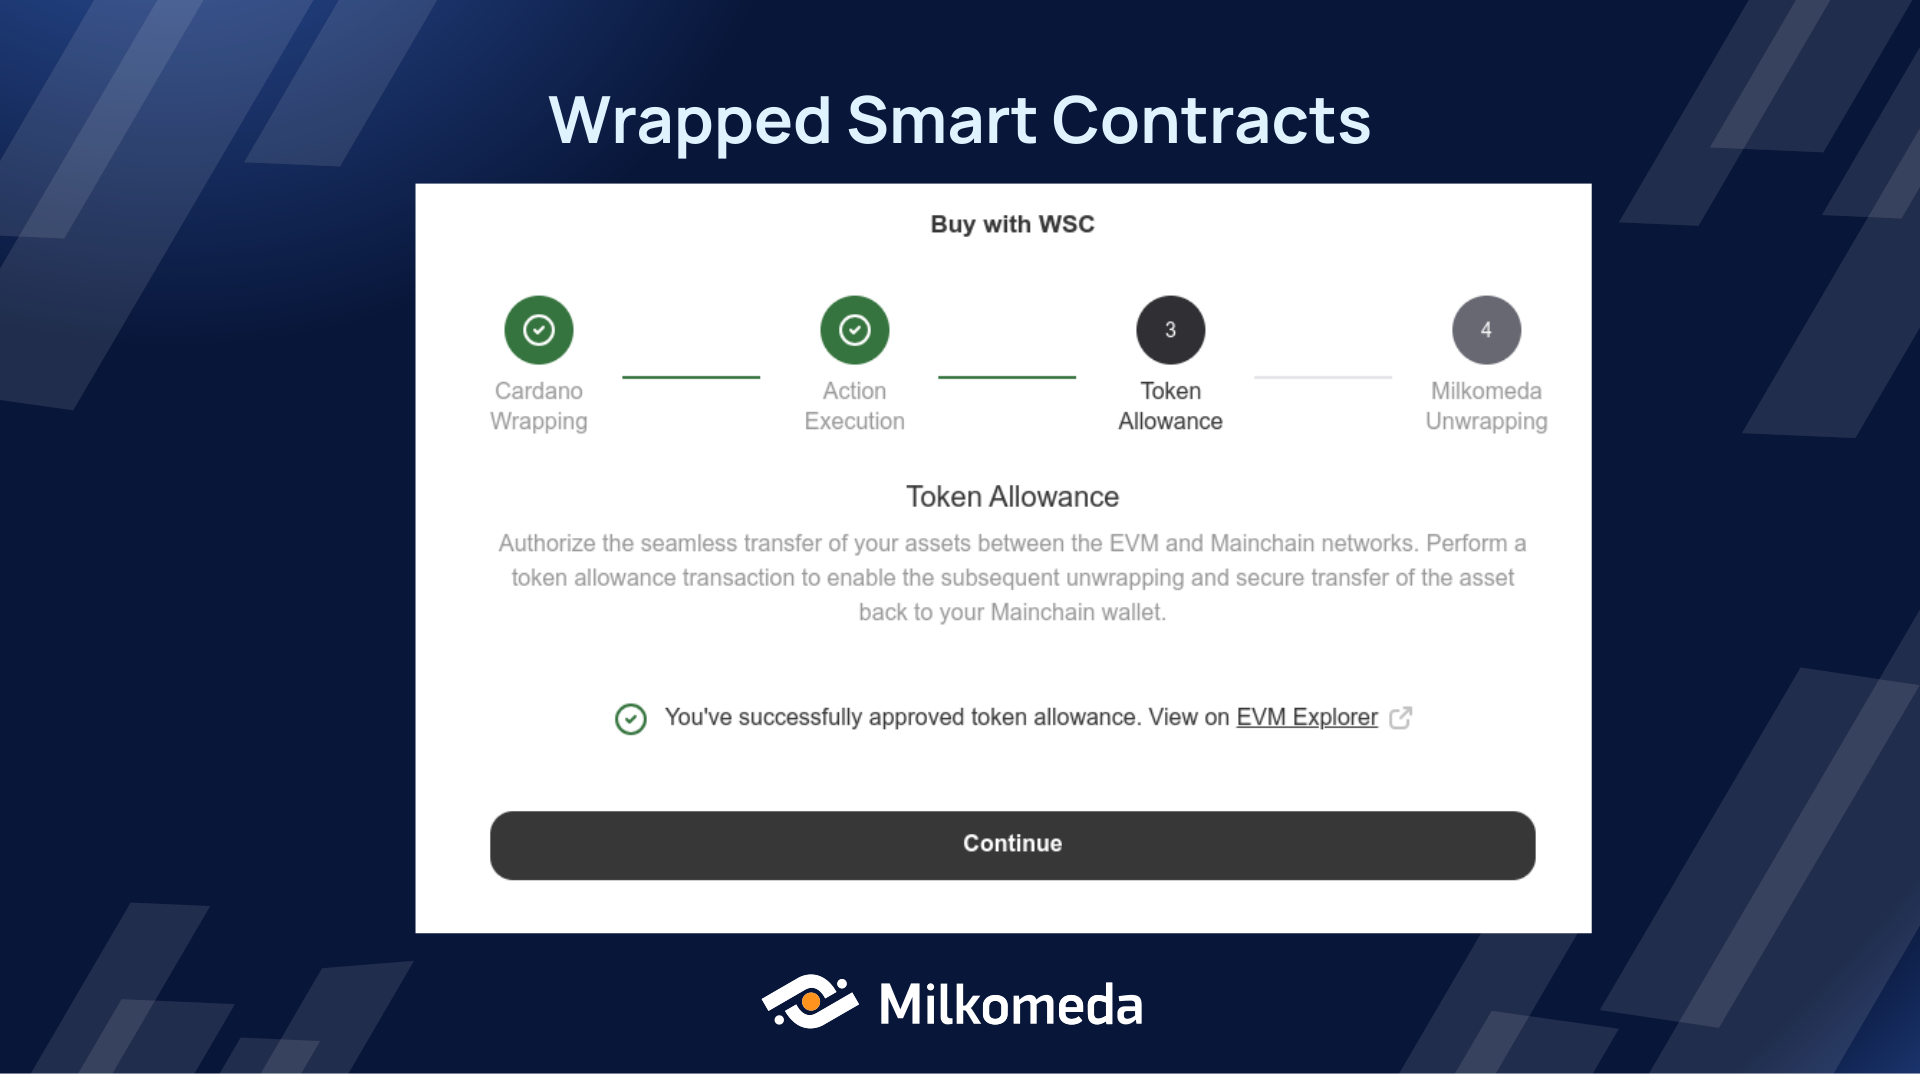
- Token Allowance: Set an allowance for transferring ReserveCoin from WSC to the Layer 1 wallet.
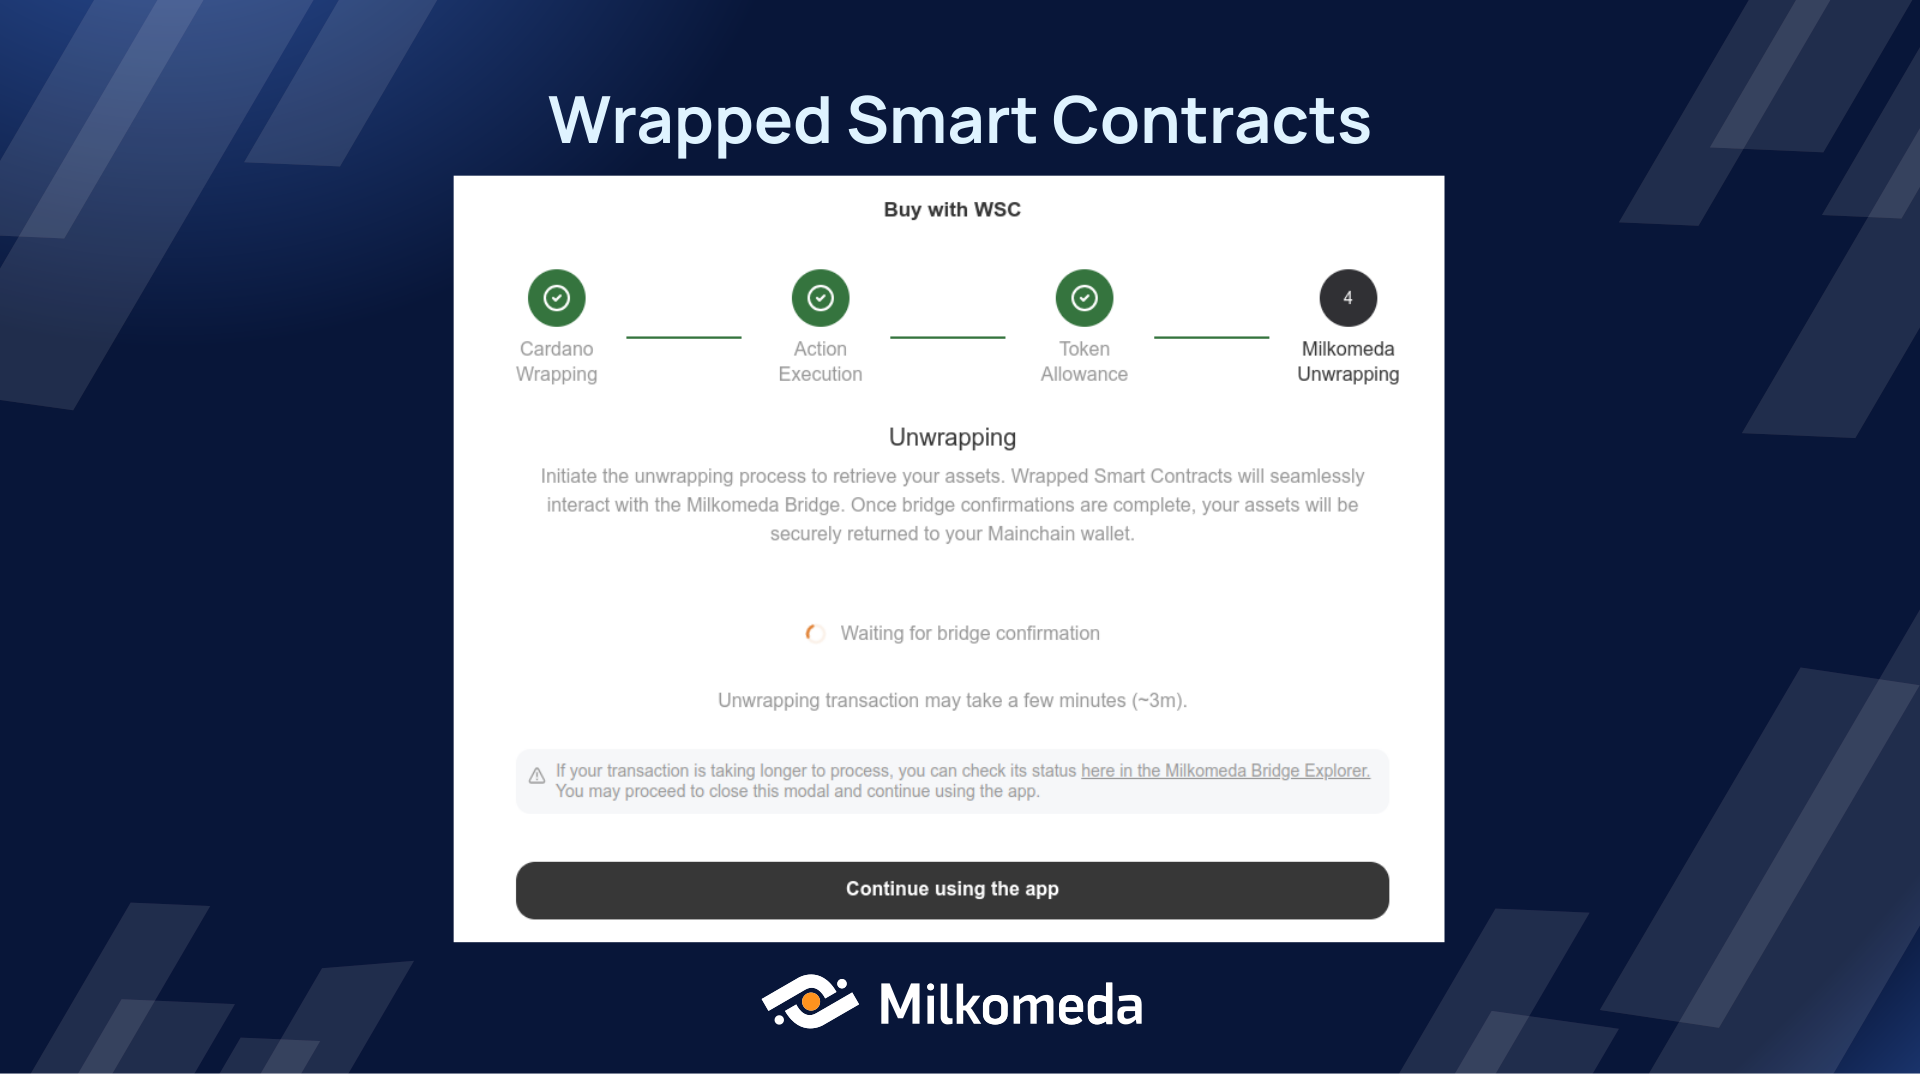
- Unwrapping: Transfer assets back to Layer 1 using the Milkomeda Bridge.
- Step 1
- Step 2
- Step 3
- Step 4
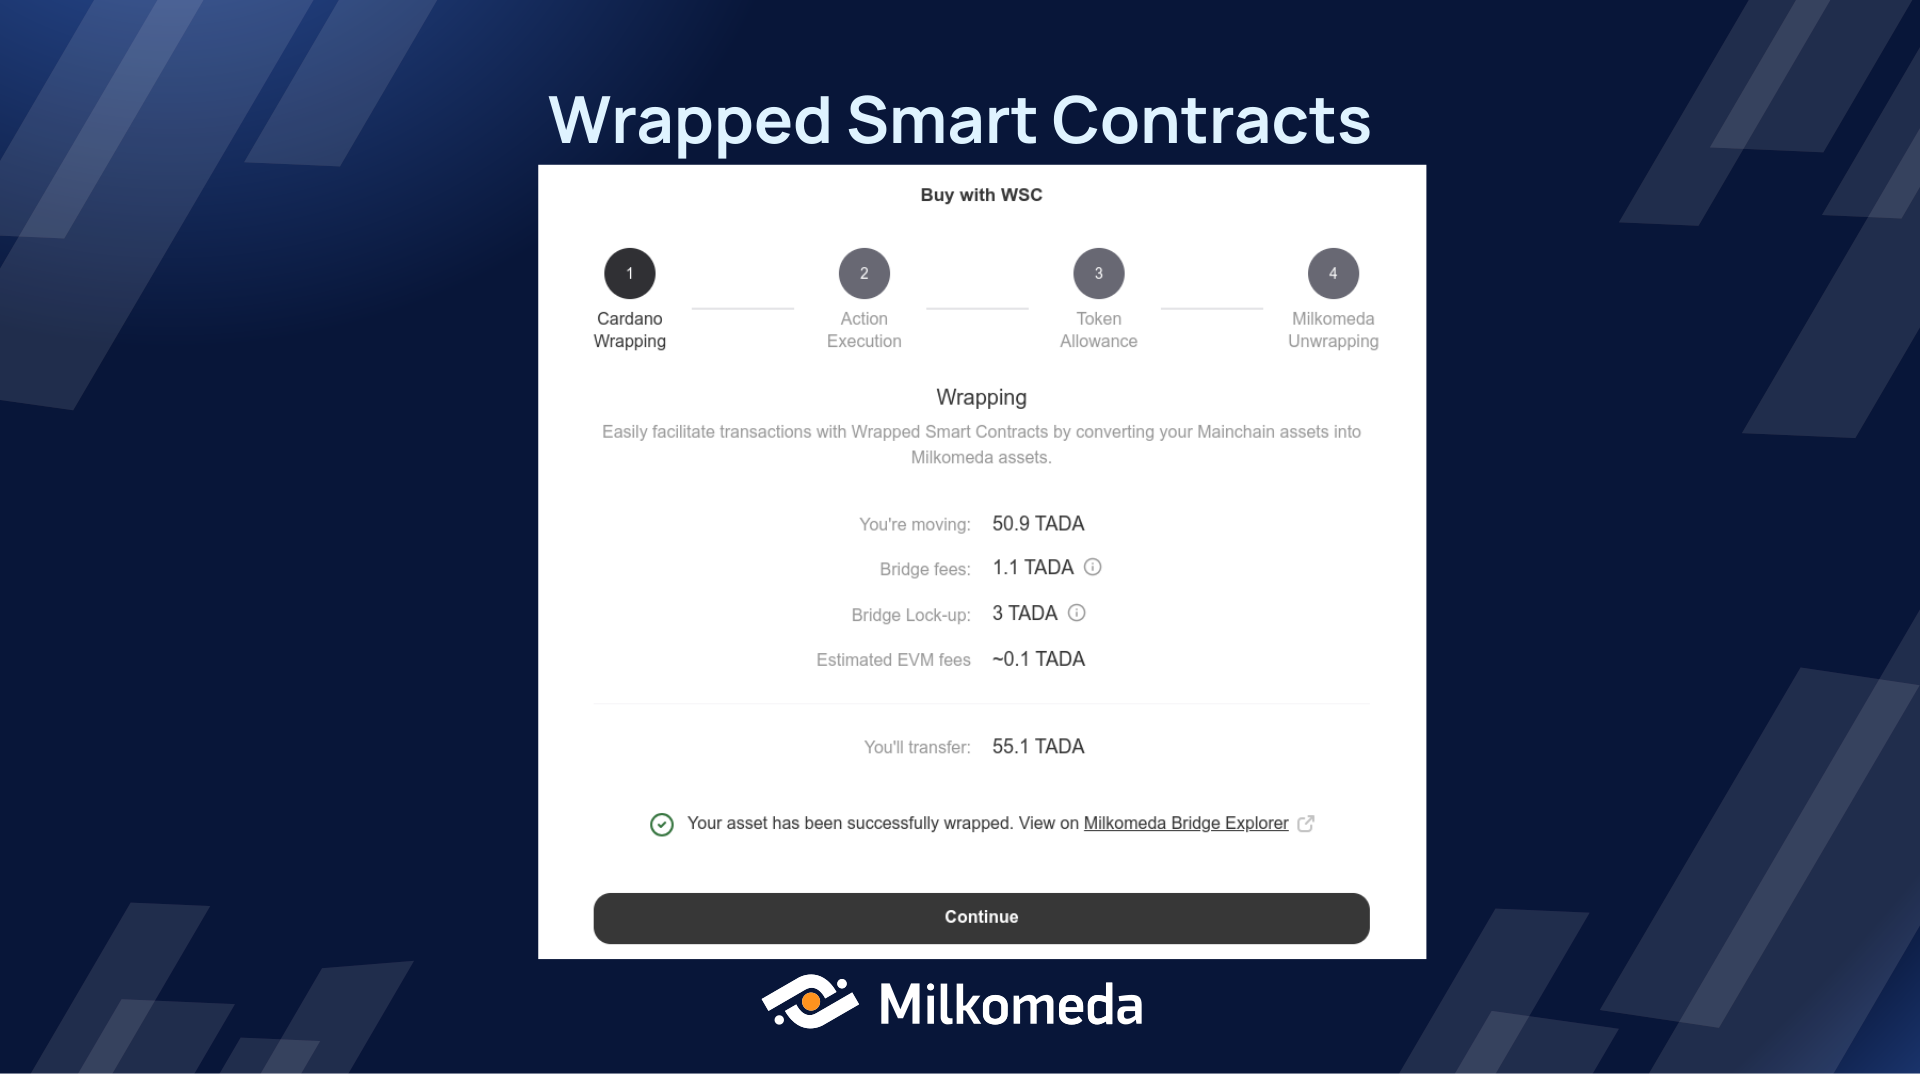
Wrapping: Convert Layer 1 assets to Milkomeda assets to perform actions on Layer 2
The first step is to convert the Mainchain assets into Milkomeda assets, known as wrapping, for them to be available to perform the action on the Layer 2. In this example we will be need 50.9 TADA to buy the Reservecoin and we will need to wrap an additional 4.2 TADA to cover transaction costs.
Example:
| Buy ReserveCoin | 50.9 TADA |
| Bridge fees | 1.1 TADA |
| Bridge Lock-up | 3 TADA |
| Estimated EVM fees | ~0.1 TADA |
| Total | 55.1 TADA |
Wrapping transaction may take a few minutes (~4m).
A few minutes after signing the transaction, a confirmation will be presented and the user can move to the next step. A link to the bridge transaction for wrapping the assets is also presented.
At this point, the assets are now in the WSC on the Layer 2.
Execute Action: Execute the desired action on Layer 2
The second step is to execute the action on the Layer 2. In this case we are buying Djed ReserveCoin, so we will be swapping TADA for Djed ReserveCoin (MOR).
After confirming the transaction, a confirmation is presented with a link to the transaction on the Layer 2 (Milkomeda C1 Sidechain).
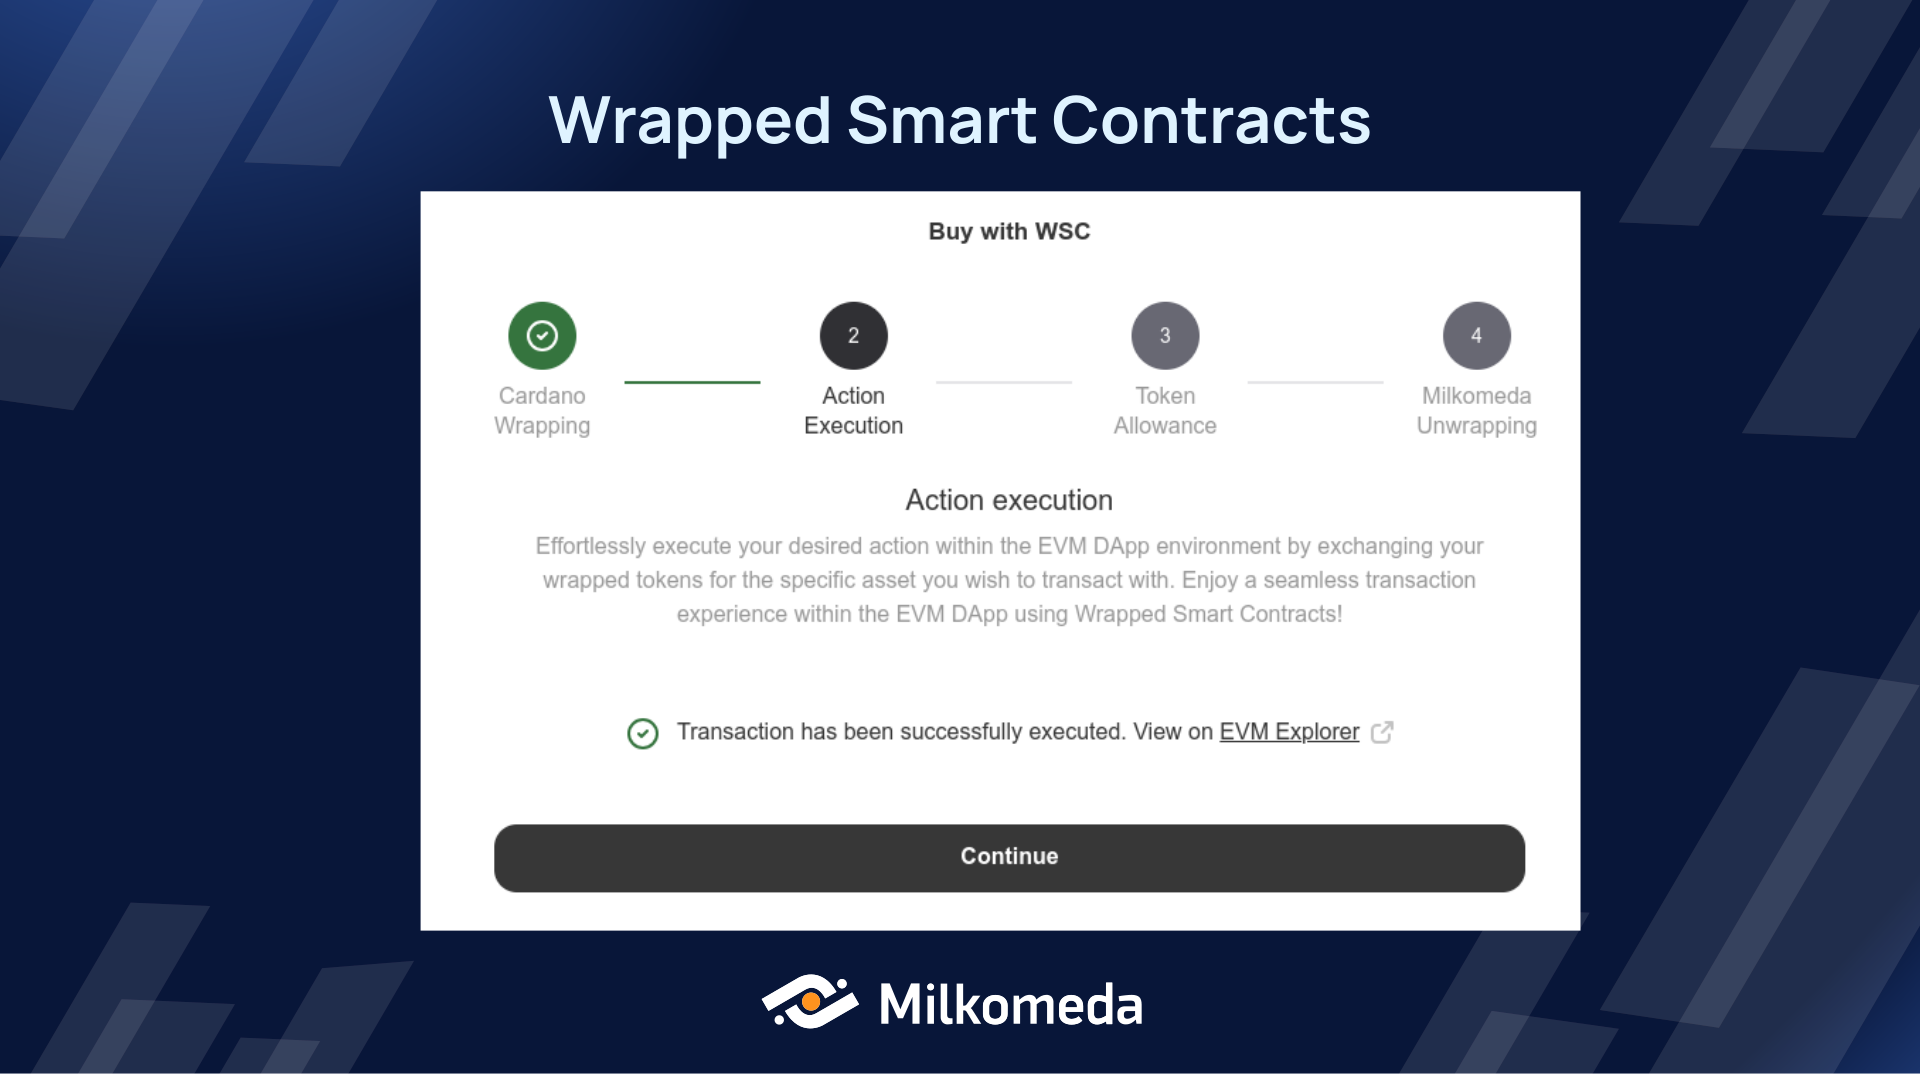
After this step, the WSC holds the ReserveCoin.
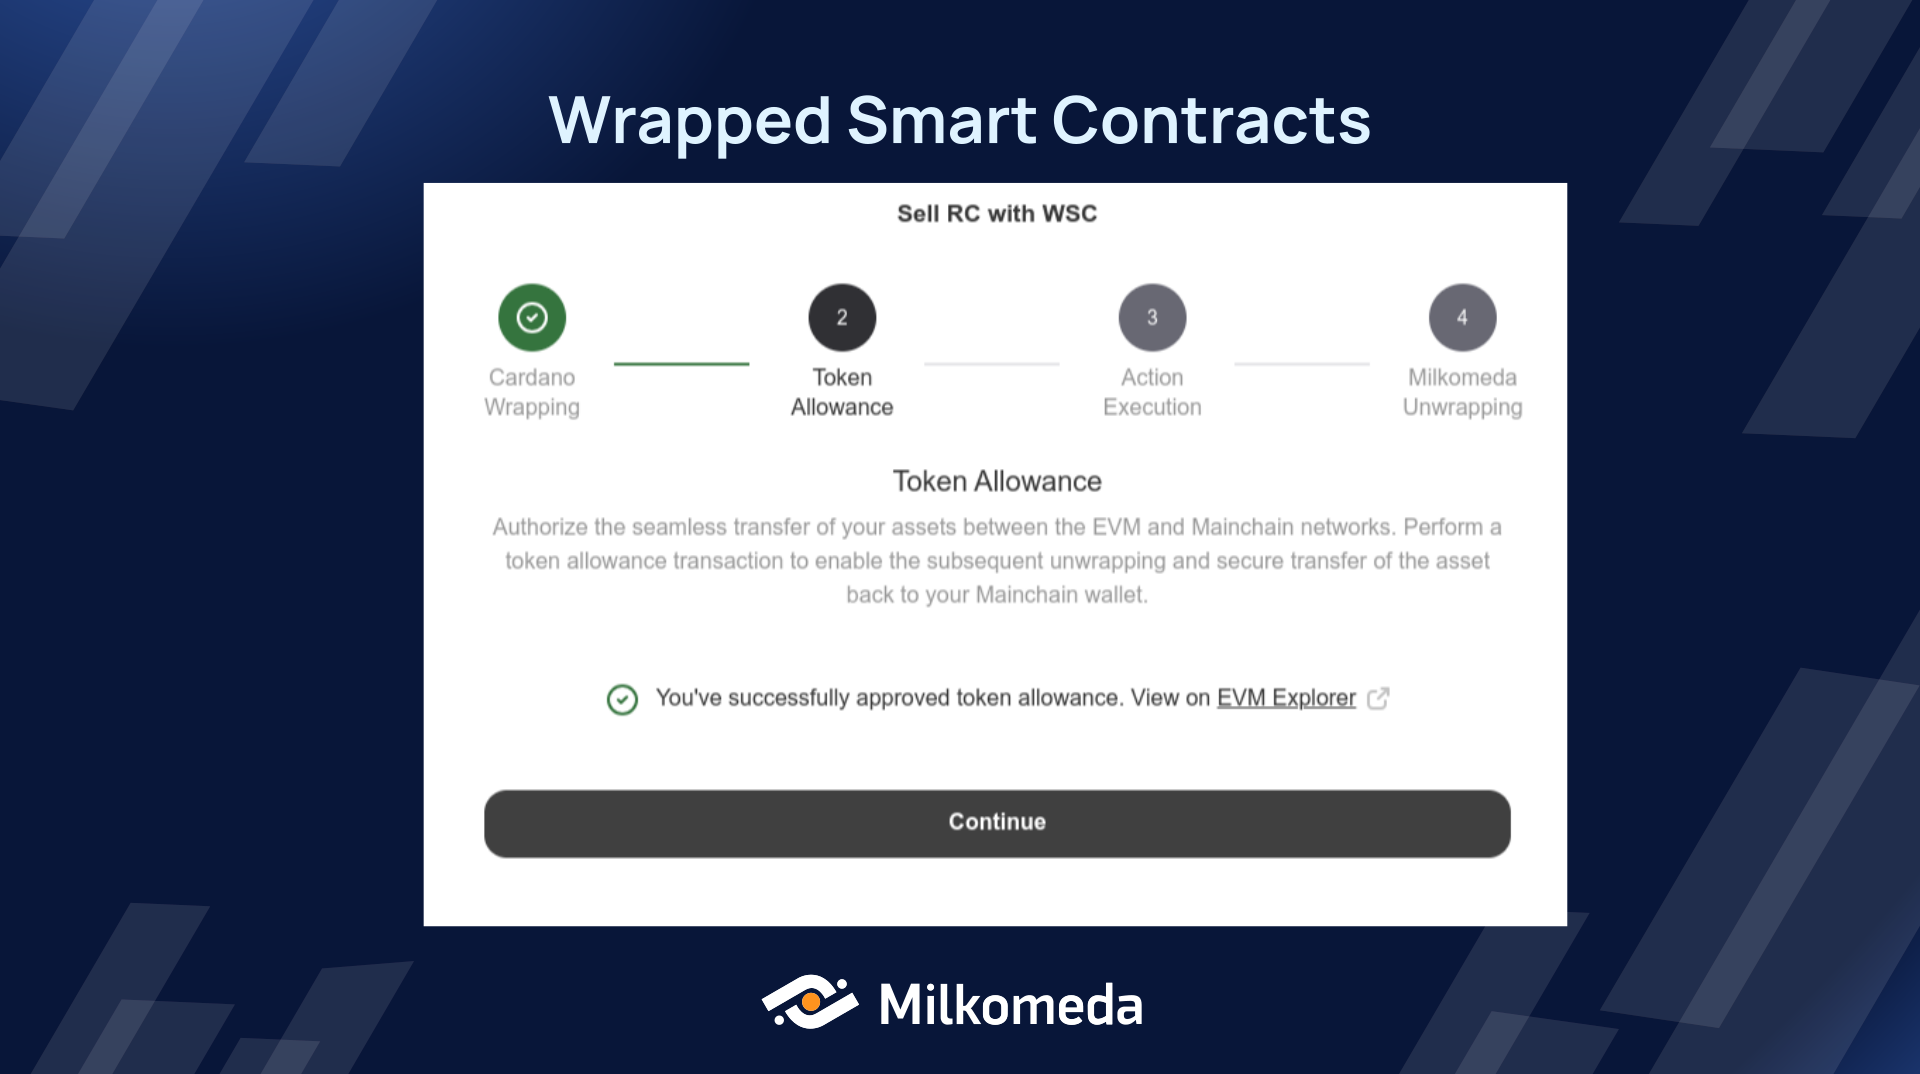
Token Allowance: Set an allowance for transferring ReserveCoin from WSC to the Layer 1 wallet
Because the call to transfer the tokens (ReserveCoin) held in the WSC to the Mainchain wallet will be triggered by another contract, the user must set an allowance for this transfer in step 3.
After confirming the allowance change, a confirmation is presented with a link to the transaction on the Layer 2 (Milkomeda C1 Sidechain).
After this step, the WSC still holds the ReserveCoin.
Unwrapping: Transfer assets back to Layer 1 using the Milkomeda Bridge
The final step will transfer the asset (ReserveCoin in this example) to the Layer 1. WSC will seamlessly interact with the Milkomeda Bridge. Once bridge confirmations are complete, the assets will be securely returned to the mainchain wallet.
Example: Is this example, 50 ReserveCoin will be transferred to the Layer 1 Wallet, while paying 1 TADA in bridge fees.
The Initial deposit of 3 TADA will be released
| Bridge fees | 1 TADA |
| You'll transfer | 50 RC |
| Deposit Release | 3 TADA |
Each step requires confirmation and, in some cases, may involve fees or waiting for bridge confirmations.
To summarize all the steps performed for the buying process, after the connection was made, the Dapp action was triggered to wrap ADA to the L2, which was then swapped for Djed ReserveCoin. The ReserveCoin was subsequently unwrapped back to Layer 1, ending up in the Cardano address of the user.
Selling ReserveCoin (Djed Protocol)
The steps to sell the ReserveCoin, instead of buying, are very similar with the following differences:
- In the case of buying, ADA is wrapped to the L2, swapped, and then ReserveCoin is unwrapped to the L1. However, in the case of selling, the ReserveCoin is wrapped to the L2, swapped for mADA, and then mADA is unwrapped back to ADA on the L1.
- The order of the steps for the sell action is slightly different. Since the ReserveCoin is an ERC20 token, the user will have to approve spending it to enable the swap. This approval step on the buying process was done after the swap in order to be able to unwrap the ReserveCoin.
- Connecting the Wallet - Users can click "Connect your wallet" and choose "Flint WSC" to create a new address with the Wrapped Smart Contract, eliminating the need for multiple wallets.
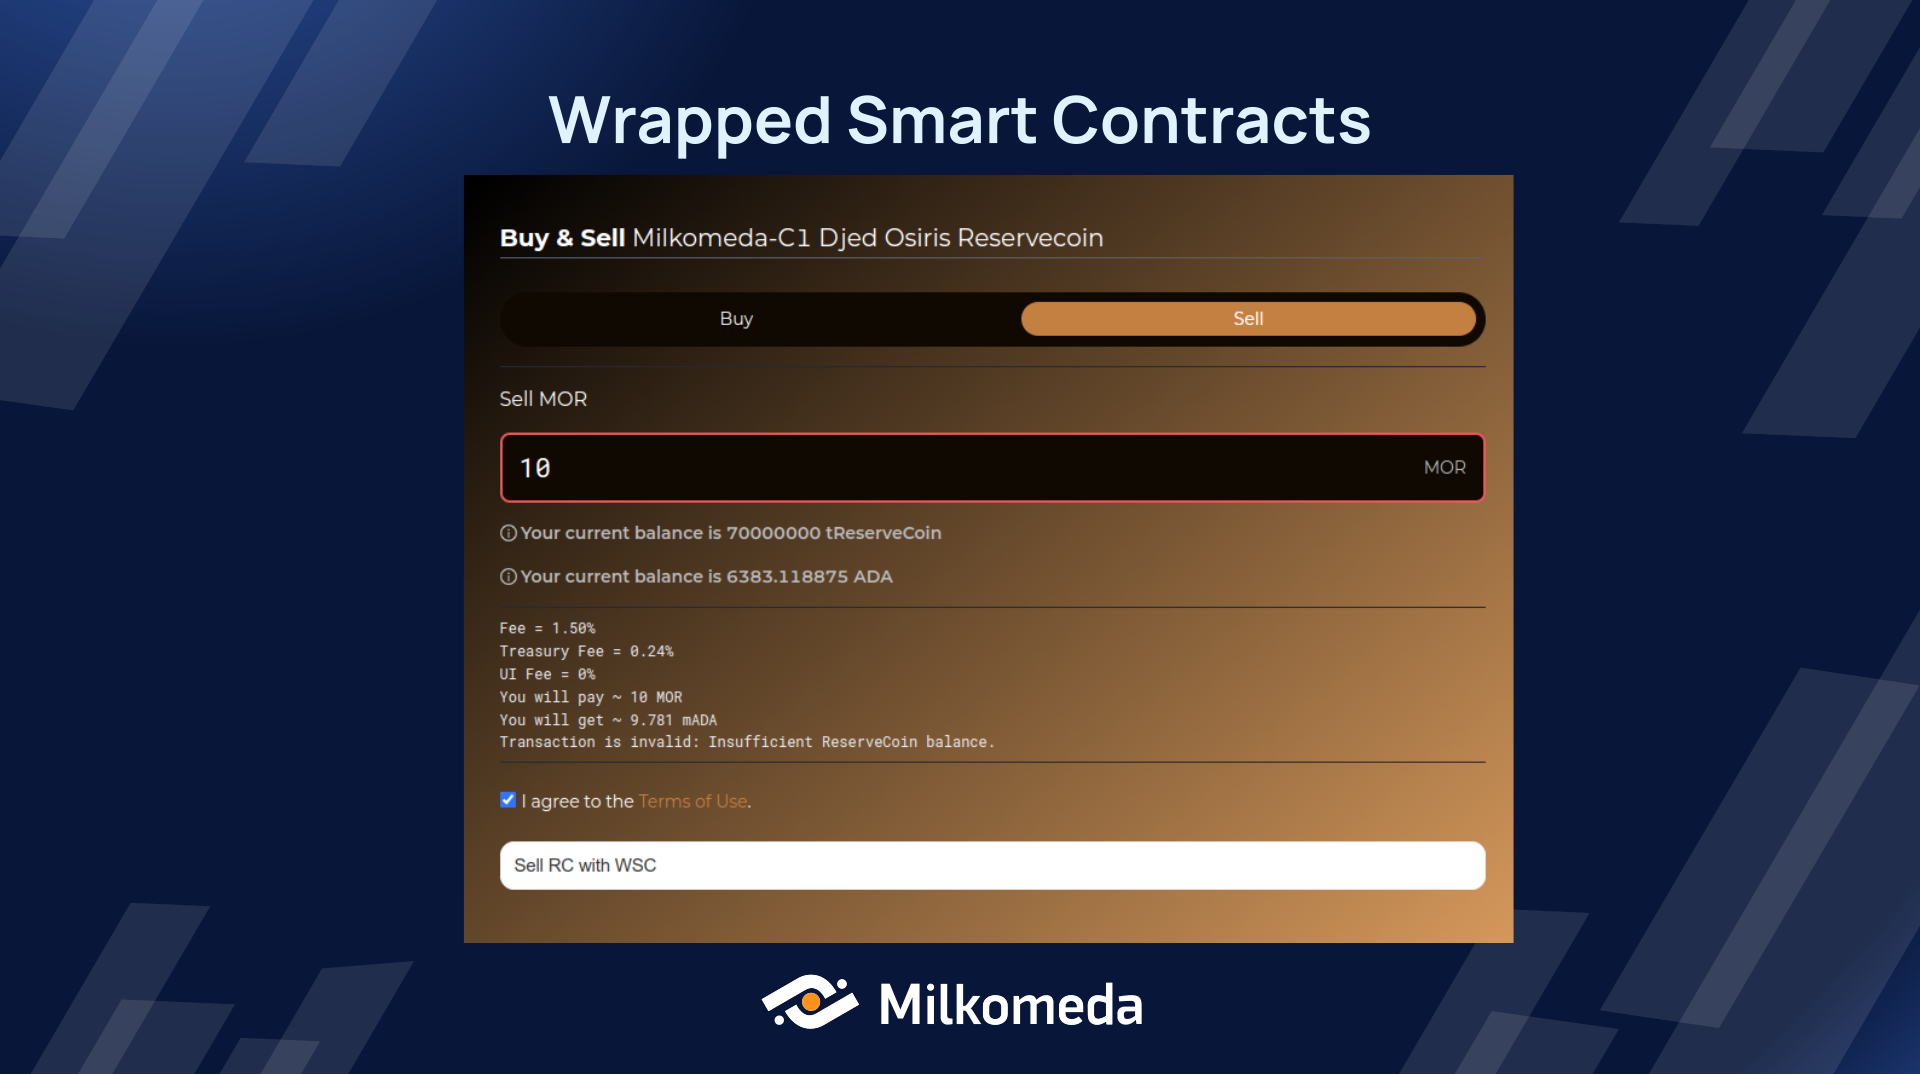
- Initiating the Action - The user can initiate the interaction with the DApp as he normally would. In this case, one would select the required options ("Sell") and input the required amount an then press the "Sell with WSC" button.
- Confirming the Steps - Users need to complete several interactions:
- Wrapping: Convert Layer 1 asset (ReserveCoin) to Milkomeda assets to perform actions on Layer 2.
- Token Allowance: Set a spending allowance for swapping ReserveCoin to mADA.
- Execute Action: Execute the desired action on Layer 2, in this case, selling (swapping) Djed ReserveCoin for mADA.
- Unwrapping: Transfer assets (ADA) back to Layer 1 using the Milkomeda Bridge.
- Step 1
- Step 2
- Step 3
- Step 4
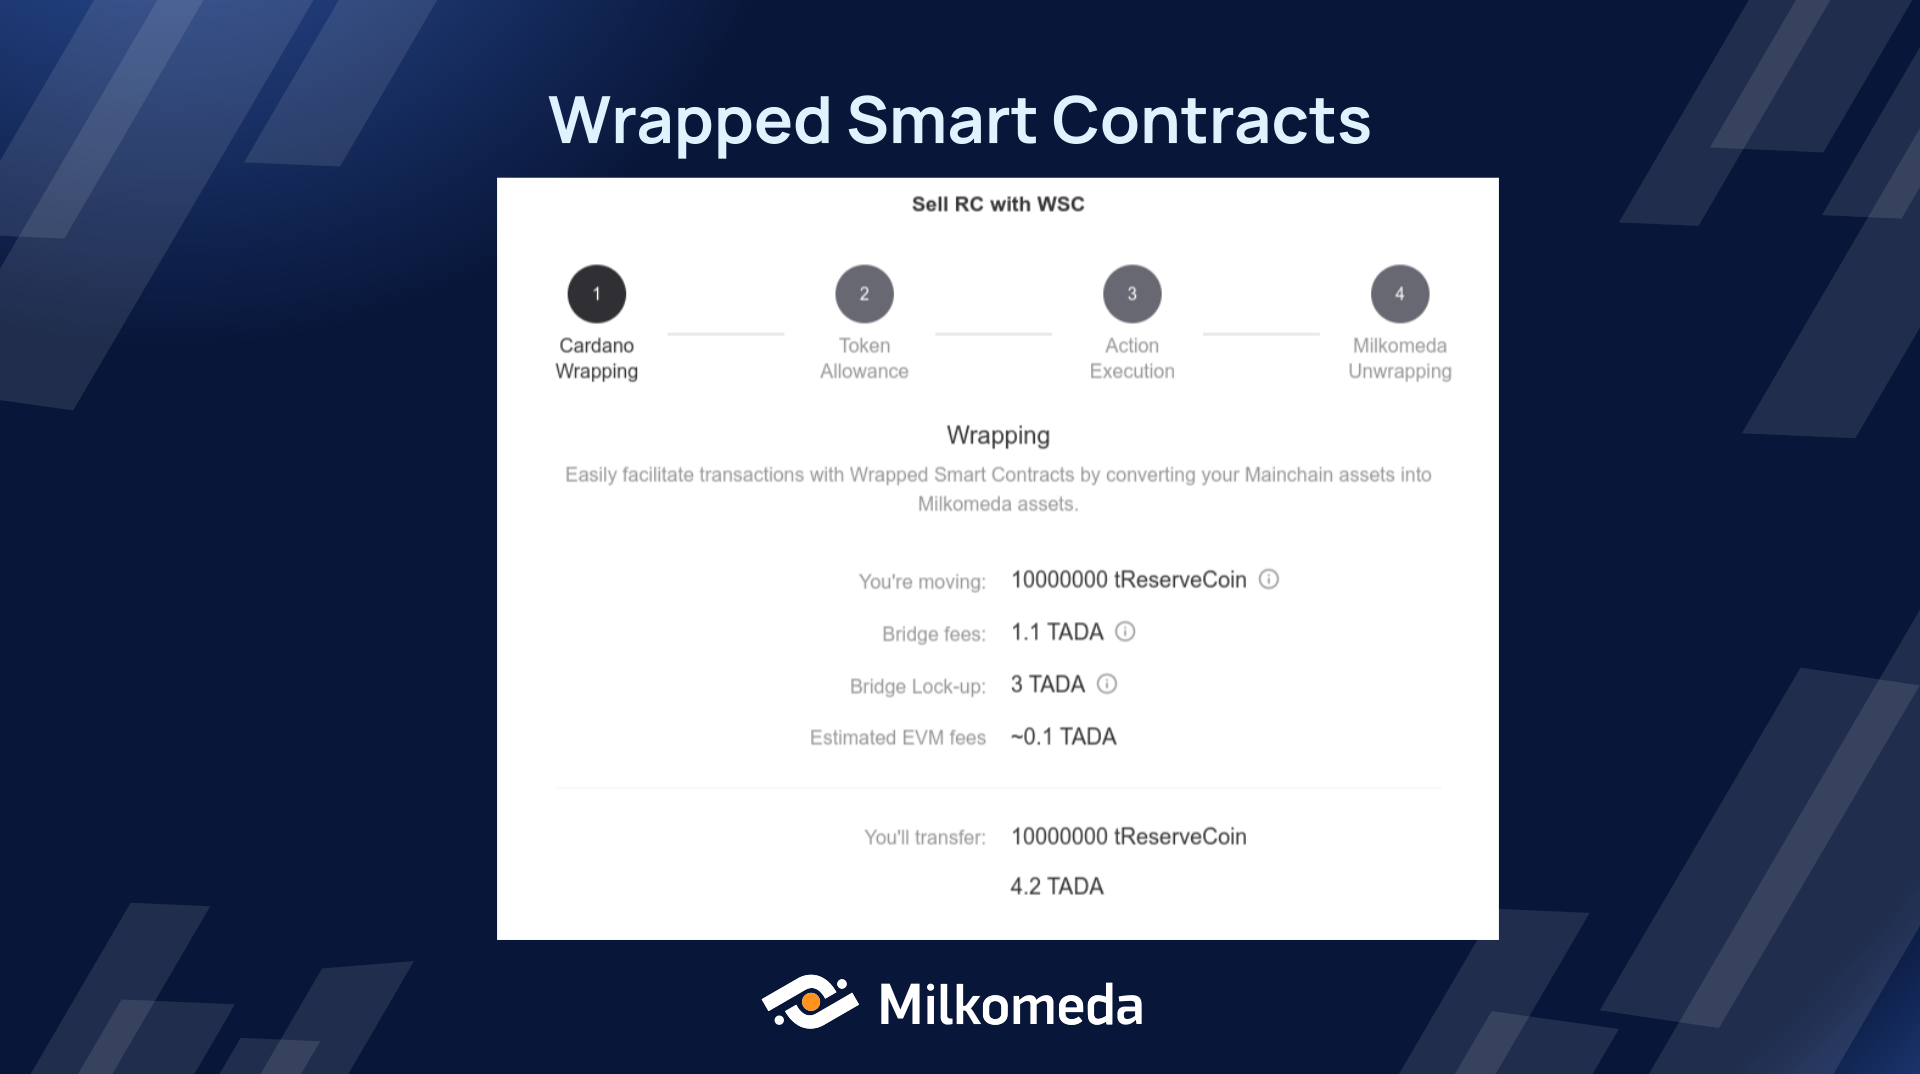
Wrapping: Convert Layer 1 assets to Milkomeda assets to perform actions on Layer 2
The first step is to convert the Mainchain assets into Milkomeda assets, known as wrapping, for them to be available to perform the action on the Layer 2. In this example we will wrap the Reservecoin and we will need to wrap an additional 4.2 TADA to cover transaction costs.
Example:
| Move ReserveCoin | 10,000,000 tReserveCoin |
| Bridge fees | 1.1 TADA |
| Bridge Lock-up | 3 TADA |
| Estimated EVM fees | ~0.1 TADA |
| Total ReserveCoin | 10,000,000 tReserveCoin |
| Total TADA | 4.2 |
Wrapping transaction may take a few minutes (~4m).
A few minutes after signing the transaction, a confirmation will be presented and the user can move to the next step. A link to the bridge transaction for wrapping the assets is also presented.
At this point, the assets are now in the WSC on the Layer 2.
Token Allowance: Set an allowance for swapping ReserveCoin for mADA
A normal previous step to any ERC20 swap is the token spending approval. This will allow the swapping contract to call the TransferFrom on the ReserveCoin token.
After confirming the allowance change, a confirmation is presented with a link to the transaction on the Layer 2 (Milkomeda C1 Sidechain).
After this step, the WSC still holds the ReserveCoin.
Execute Action: Execute the desired action on Layer 2
The thirst step is to execute the action on the Layer 2. In this case we are selling Djed ReserveCoin, so we will be swapping Djed ReserveCoin (MOR) for mADA.
After confirming the transaction, a confirmation is presented with a link to the transaction on the Layer 2 (Milkomeda C1 Sidechain).
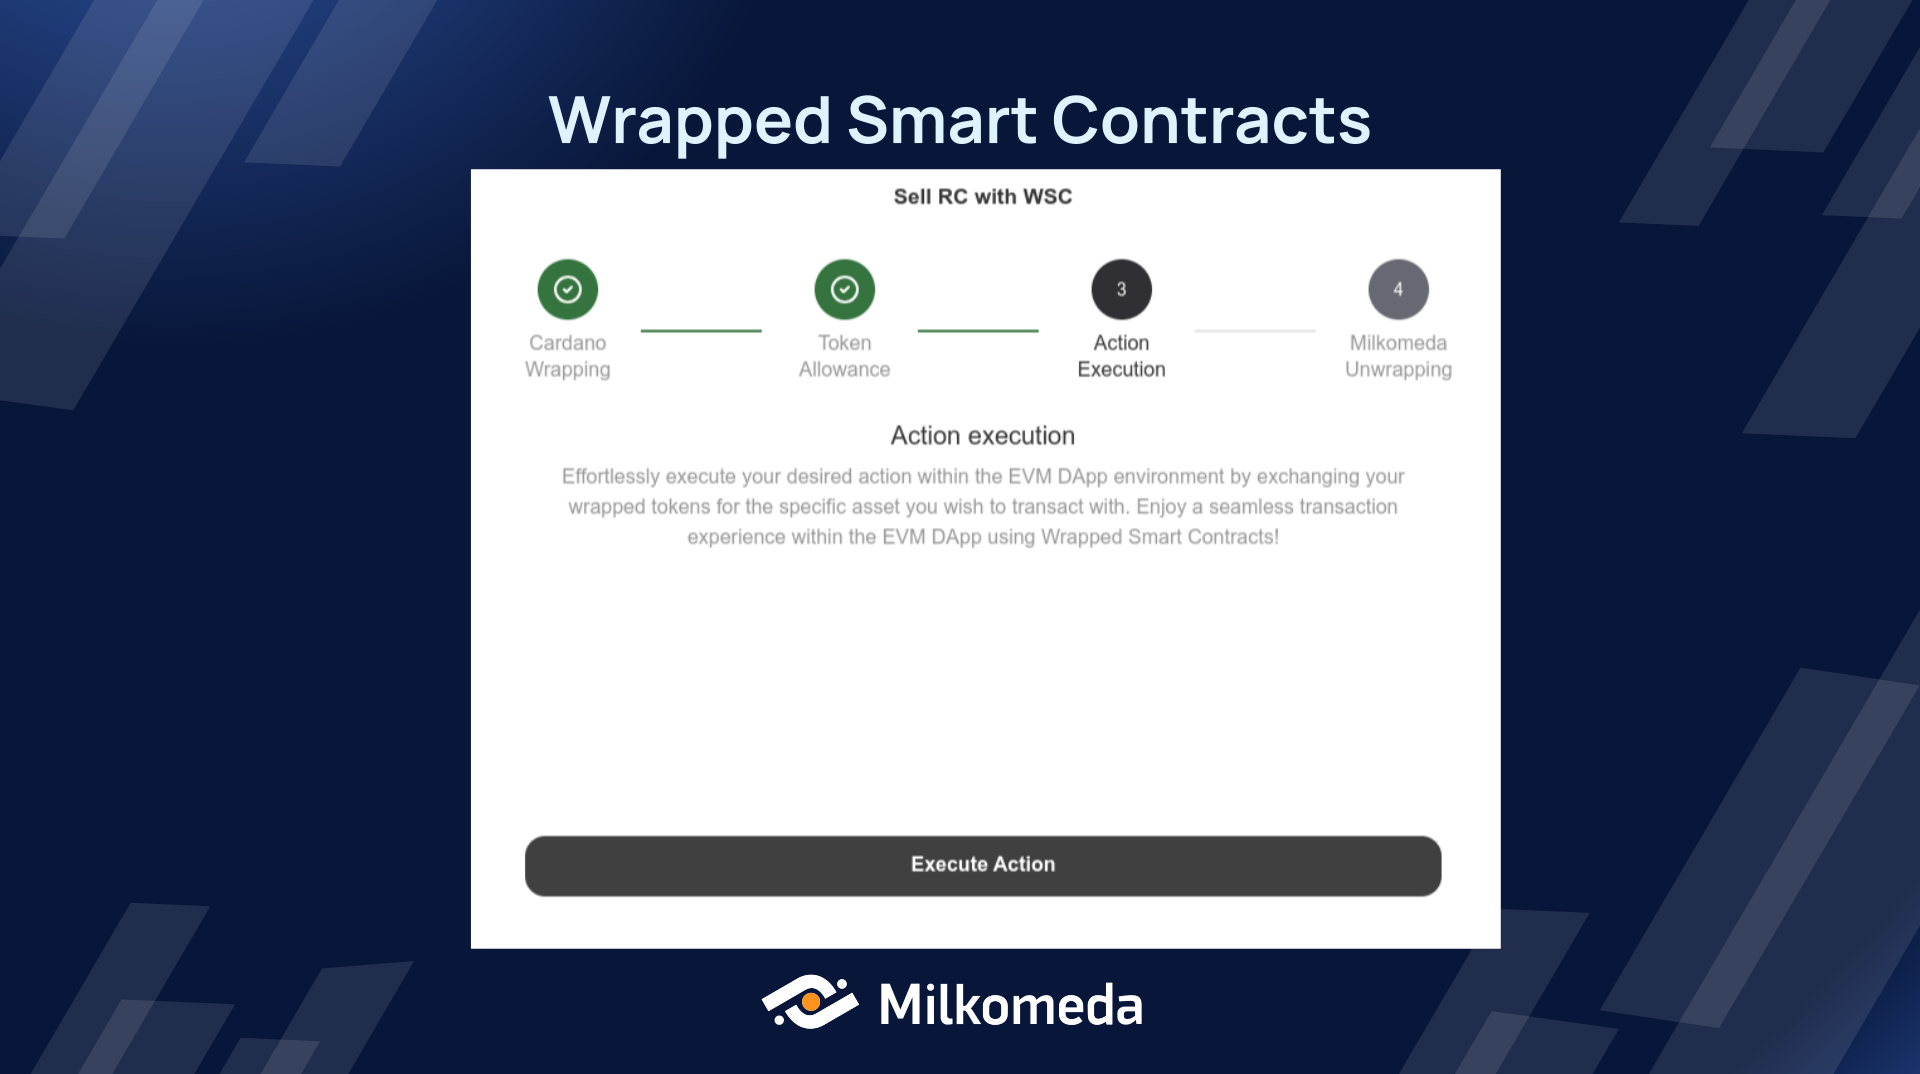
After this step, the WSC holds the mADA that resulted from the swap.
Unwrapping: Transfer assets back to Layer 1 using the Milkomeda Bridge
The final step will transfer the asset (mADA in this example) to the Layer 1. WSC will seamlessly interact with the Milkomeda Bridge. Once bridge confirmations are complete, the assets will be securely returned to the mainchain wallet.
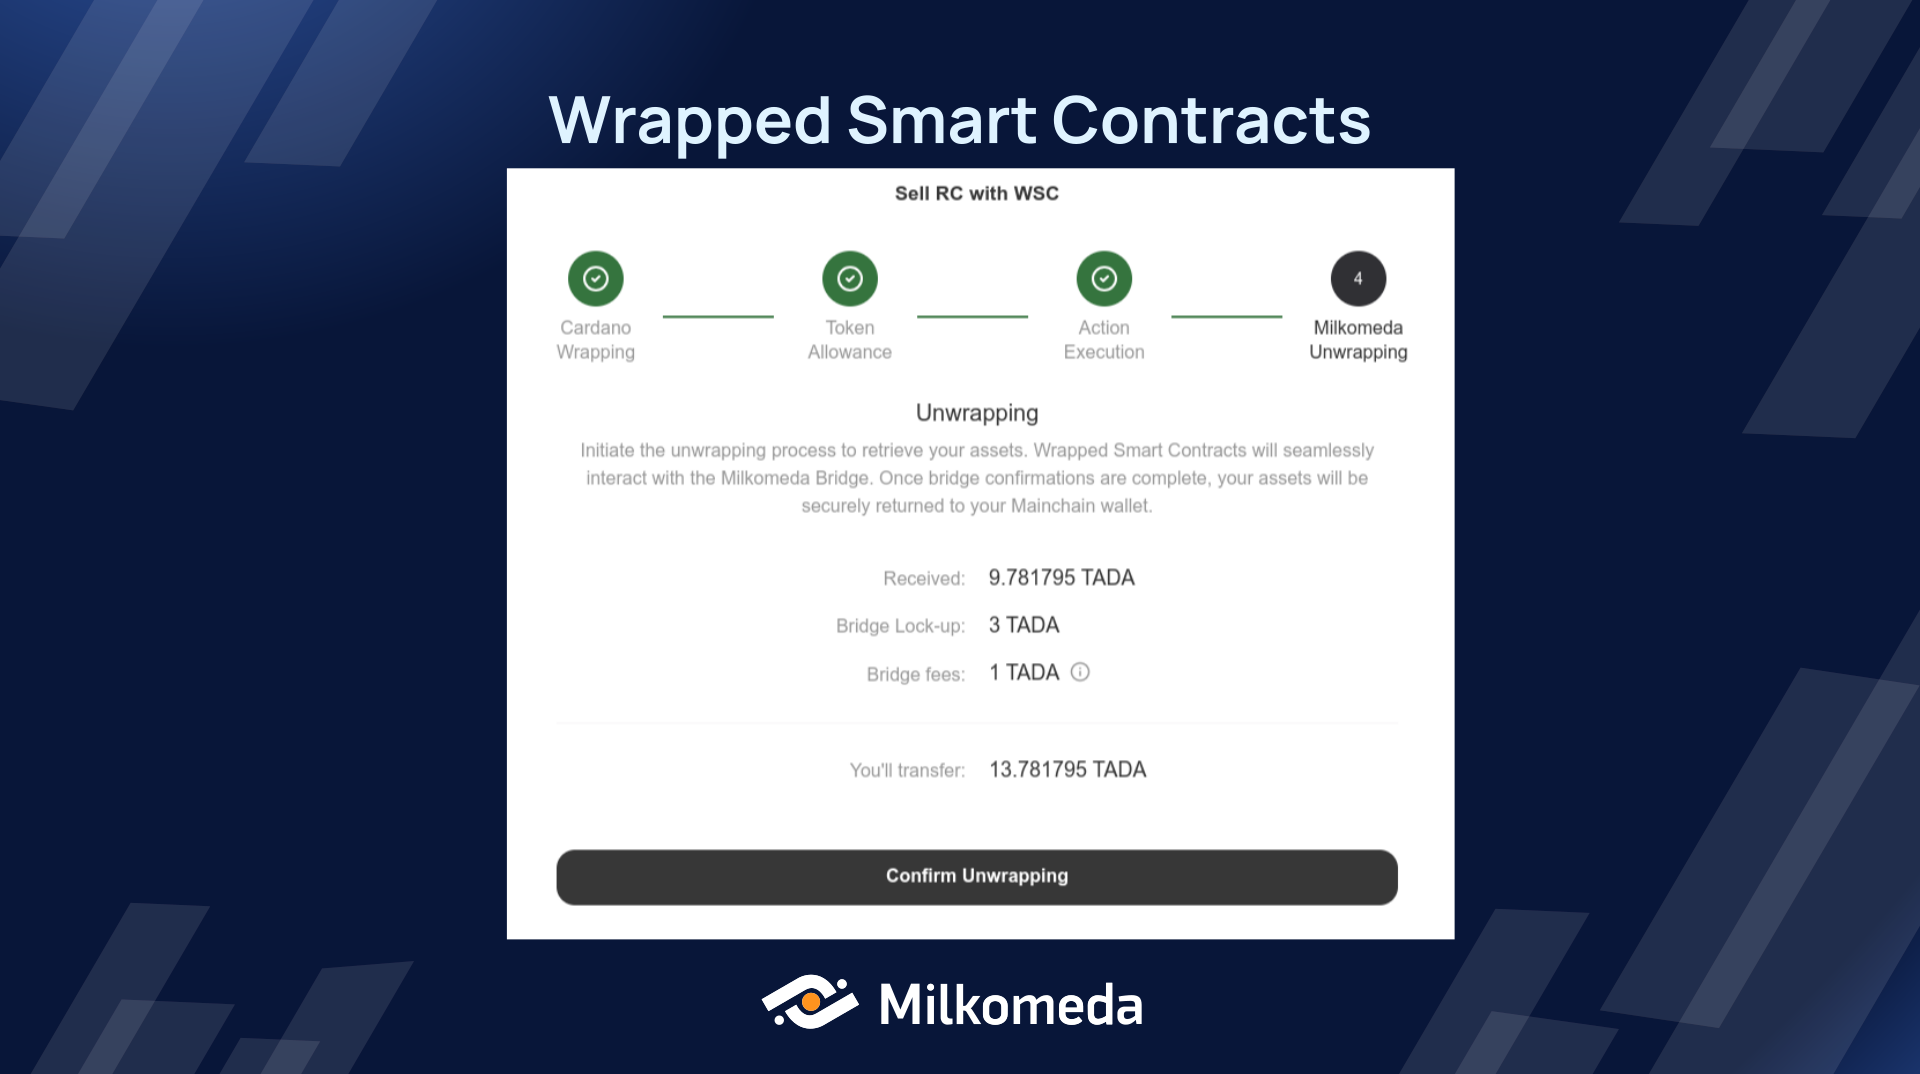
Example: Is this example, 9.781795 TADA will be transferred to the Layer 1 Wallet, while paying 1 TADA in bridge fees.
The Initial deposit of 3 TADA will be released
| Bridge fees | 1 TADA |
| You'll transfer | 9.781795 TADA |
| Deposit Release | 3 TADA |
To summarize all the steps performed for the selling process, after the connection was made, the Dapp action was triggered to wrap ReserveCoin to the L2, which was then swapped for mADA. The mADA resulting from the swap was subsequently unwrapped back to Layer 1, ending up in the Cardano address of the user.
Summary
Wrapped Smart Contracts on Milkomeda's Layer 2 provide a seamless user experience, enabling users to interact with DApps without the complexities of managing multiple wallets. The unified interaction flow between Layer 1 and Layer 2 enhances user convenience and encourages adoption, setting a new standard for smart contract-enabled blockchains and their ecosystems.