How to integrate
To provide developers with a seamless and intuitive way to integrate Wrapped Smart Contracts, we provide the Milkomeda WSC UI, a robust React component library designed to facilitate Wrapped Smart Contract usage with your dApp. It offers an intuitive and user-friendly approach to quickly get developers started with integration, ensuring a smooth and visually appealing user experience.
Milkomeda WSC UI
Getting Started
To showcase the functionaly, we'll start a nextjs project from scratch and integrate milkomeda-wsc-ui on Milkomeda C1 Devnet.
The goal will be to interact with a "Vending machine" smart contract that will dispense an ERC20 token for the same amount as mADA that is sent to it when calling a buyTokens function.
Get started with create-next-app (install a specific next vesion to ensure compatibility)
npx create-next-app next-wsc && cd next-wsc && npm i -S next@13.2.4
Install the required dependencies: milkomeda-wsc-ui, wagmi and ethers
npm install wagmi@0.12.15 ethers@5.x milkomeda-wsc-ui-test-beta
To enable top-level await and WebAssembly support, we'll need to make the following changes to the next config file:
// next.config.js
const nextConfig = {
  reactStrictMode: true,
  transpilePackages: ["milkomeda-wsc-ui-test-beta", "milkomeda-wsc"],
  swcMinify: true,
  webpack: (config) => {
    config.experiments = {
      asyncWebAssembly: true,
      topLevelAwait: true,
    };

    return config;
  },
};

module.exports = nextConfig;
Integration Approaches
There are several ways to structure the integration of wrapped smart contracts in Dapps, but Milkomeda WSC UI package offers two explicit solutions for integrating the necessary steps and prompts: (i) one where the prompts and actions are seamlessly embeded in the DApp frontend, and (ii) another where the user is presented with a wallet like interface that can be opened from the frontend.
Integrated DApp Frontend
This method involves embedding the essential user prompts directly into the EVM DApp UI. When users interact with the protocol, such as performing a swap, a modal opens atop the UI, guiding them through four main steps: wrapping, executing the action, approving token spending, and finally unwrapping back to the mainchain.
Here's a preview of the first step that would be integrated in the DApp frontend
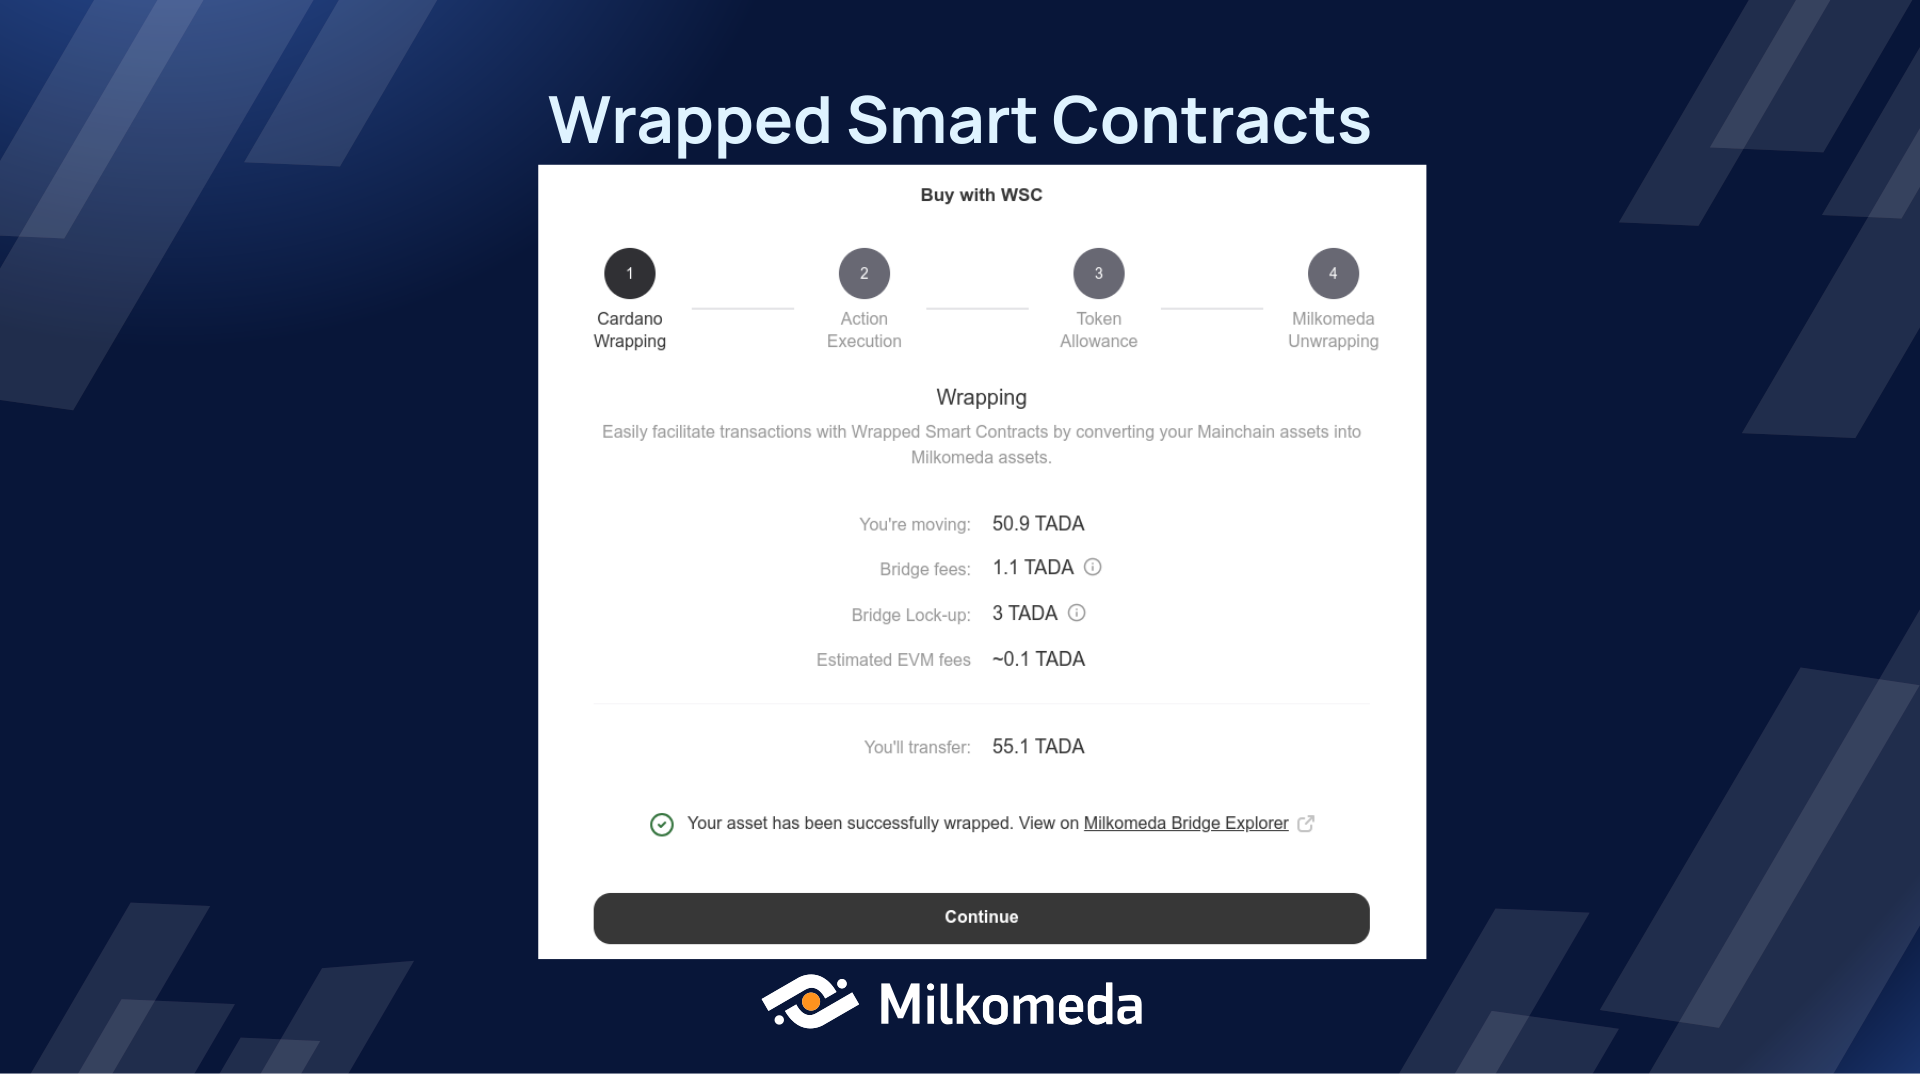
For a detailed, comprehensive example of this implementation, please refer to the For Users section.
Usage
After importing wagmi and milkomeda-wsc-ui into your project, you can create a configuration using either wagmi's createConfig method or utilize the pre-configured getDefaultConfig provided by milkomeda-wsc-ui to enable connection to Milkomeda C1.
In the newly created nextjs project, replace the contents of the _app.tsx file with the following:
(please replace the <BLOCKFROST_KEY> with your own)
// _app,tsx

import '@/styles/globals.css'
import type { AppProps } from 'next/app'

import { WagmiConfig, createClient } from "wagmi";
import {
  ConnectWSCProvider,
  getDefaultConfig,
  MilkomedaNetworkName,
} from "milkomeda-wsc-ui-test-beta";

const client = createClient(
  getDefaultConfig({
    oracleUrl: "https://wsc-server-devnet.c1.milkomeda.com",
    blockfrostId: "<BLOCKFROST_KEY>",
    network: MilkomedaNetworkName.C1Devnet,
    cardanoWalletNames: ["flint"], // , "eternl", "nami", "nufi", "yoroi"
  })
);


export default function App({ Component, pageProps }: AppProps) {
  return (
    <WagmiConfig client={client}>
      <ConnectWSCProvider>
        <Component {...pageProps} />
      </ConnectWSCProvider>
    </WagmiConfig>
  );
}
The client configs will have to contain the oracleUrl and a blockfrontId. The oracle RPC endpoint will be different on mainnet and devnet.
| Chain | RPC URL |
|---|---|
| Mainnet | https://wsc-server-devnet.c1.milkomeda.com |
| Devnet | https://wsc-oracle-c1-mainnet.milkomeda.com |
The ConnectWSCProvider will need to be at the root of the application because it supplies all information about the WSC Provider such as your balance in L1, origin tokens, evm tokens, etc. Learn more about it here
ConnectWSCProvider: more info
If you wish to access any of these values, you can utilize the custom hook useWSCProvider. This hook provides you with the necessary functionality to access the desired values conveniently.
Example:
const Component = () => {
  const {
    wscProvider,
    pendingTxs,

    address,
    destinationBalance,
    originBalance,
    originTokens,
    tokens,
    originAddress
  } = useWSCProvider();

  return(...)
}
Then we need to set up a React provider (TransactionConfigWSCProvider) specifically designed to facilitate the configuration setup for using WSC (Wrapped Smart Contracts) in your dApp.
Within this provider, you can conveniently define various aspects of the configuration using an options object, including the Cardano token you wish to wrap, the EVM contract request, and the EVM token you intend to unwrap at the end of the process. It's important to note that when utilizing the provider, make sure to include the ConnectWSCButton as its child. This ensures that the action is correctly targeted and associated with the relevant functionality.
It's important to note that the process consists of four distinct steps:
- Wrapping - where the selected asset is made available on the layer 2 by the bridge
- WSC Action Execution (EVM contract action) - to perform a contract call on the layer 2
- Token Allowance - because the call to transfer the token held in the WSC to the Mainchain wallet will be triggered by another contract, the user must set an allowance for this transfer
- Unwrapping - to transfer the asset to the Layer 1. WSC will seamlessly interact with the Milkomeda Bridge. Once bridge confirmations are complete, the assets will be available in the mainchain wallet
The goal of the project will be to interact with a Vending Machine smart contract on Milkomeda C1 to retrieve a token. By using wrapped smart contracts, the milkomeda-wsc-ui package will take care of each of the steps above, by wrapping the required ADA amount to Milkomeda C1, interacting with the smart contract to get the m3s6 token, and then unwrapping it to Cardano.
Below is the function in the smart contract that will be called:
    function buyTokens(address _receiver) public payable returns (bool) {
        require(
            IERC20(m3s6).transfer(_receiver, msg.value / 1e12),
            "Transfer failed"
        );
        return true;
    }
Full code of Vending Machine smart contract
// SPDX-License-Identifier: MIT
pragma solidity 0.8.17;

import "@openzeppelin/contracts/token/ERC20/IERC20.sol";

contract VendingMachine {
    address public m3s6 = 0x5fA38625dbd065B3e336e7ef627B06a8e6090e8F;
    address public owner;

    constructor() {
        owner = msg.sender;
    }

    function deposit(uint256 _amount) public returns (bool) {
        require(
            IERC20(m3s6).transferFrom(msg.sender, address(this), _amount),
            "Transfer failed"
        );
        return true;
    }

    function withdraw(uint256 _amount) public returns (bool) {
        require(msg.sender == owner, "Only owner can withdraw");
        require(IERC20(m3s6).transfer(msg.sender, _amount), "Transfer failed");
        return true;
    }

    function buyTokens(address _receiver) public payable returns (bool) {
        require(
            IERC20(m3s6).transfer(_receiver, msg.value / 1e12),
            "Transfer failed"
        );
        return true;
    }

    function sellTokens(uint256 _amount) public payable returns (bool) {
        require(
            IERC20(m3s6).transferFrom(msg.sender, address(this), _amount),
            "Transfer failed"
        );
        payable(msg.sender).transfer(_amount);
        return true;
    }
}
Edit the index.tsx with the following code:
(alternatively, you can separate the logic into a separate component)
import type { NextPage } from "next";
import { useAccount } from "wagmi";
import {
  ConnectWSCButton,
  TransactionConfigWSCProvider,
  useWSCProvider,
} from "milkomeda-wsc-ui-test-beta";

const Home: NextPage = () => {
  const { address: account } = useAccount();
  const { isWSCConnected } = useWSCProvider();

  return (
    <div
      style={{
        display: "flex",
        alignItems: "center",
        justifyContent: "center",
        gap: 40,
        height: "100vh",
      }}>
    <TransactionConfigWSCProvider options={wscOptions}>
      <ConnectWSCButton />

      Account: { account }
      </TransactionConfigWSCProvider>
      </div>
  );
};
export default Home;
The ConnectWSCButton component can be placed wherever you want the Connect WSC Wallet button to be displayed. Scroll down to the Theme Customization section for details on theme customization options to enhance the visual styling of the button.
Feel free to use the WSC React provider multiple times and in any desired location within your application.
Then, we'll add the options object to configure the four steps in the process:
import {
  TransactionConfigWSCOptions,
} from "milkomeda-wsc-ui-test-beta";
import { ethers } from 'ethers'
import VendingMachineABI from "../abi/m3s6-vending-machine.json";

const TOKEN = "0x5fA38625dbd065B3e336e7ef627B06a8e6090e8F"
const VENDING_MACHINE = "0x5a5697633e93d7C5D319c5362B4A49f87445e33D"

  const wscOptions: TransactionConfigWSCOptions = {
    /*
    Title of the modal
    */
    titleModal: "Buy m3s6 Token",
    /*
    We need to specify which token you'll wrap
    */
    defaultWrapToken: {
      unit: "lovelace",
      amount: "1000",
    },
    /*
    We need to specify which token you'll unwrap
    */
    defaultUnwrapToken: {
      unit: TOKEN,
      amount: "1000000", // amountUnscaled
    },
    /*
    EVM Token address that we'll ask for token allowance
    */
    evmTokenAddress: TOKEN,
    /*
    EVM contract information to execute this action after wrapping
    - the args key can be used to pass function parameters as elements in the array
    - transaction parameters like value, gas, etc, can be passed in the overrides key
    */
    evmContractRequest: {
      address: VENDING_MACHINE,
      abi: VendingMachineABI.abi,
      functionName: "buyTokens",
      args: [account],
      overrides: {
        value: ethers.BigNumber.from("1000000000000000000"),
      },
    },
  }
Download the m3s6-vending-machine.json file here
and put it in a folder named abi in the root of the nextjs project.
In various scenarios, there might be a requirement to access the connected wallet in order to facilitate additional interactions or utilize other features offered by wagmi. You can seamlessly utilize all of these functionalities without any limitations as its one of our peer dependencies.
import { useAccount } from "wagmi";

// Make sure that this component is wrapped with ConnectWSCProvider
const ExampleComponent = () => {
  const { address, isConnecting, isDisconnected } = useAccount();
  if (isConnecting) return <div>Connecting...</div>;
  if (isDisconnected) return <div>Disconnected</div>;
  return <div>Connected Wallet: {address}</div>;
};
Congratulations! You have now successfully completed the setup process for Milkomeda WSC UI.
Theme Customization
The look of the components in wrapped-wsc-ui can be customized by passing a custom theme variables object to the ConnectWSCProvider. Below is an example of the available variable. Hopefully their names as self explanatory.
const customThemeVars = {
  "--wsc-border-radius": "12px",

  "--wsc-connectbutton-font-size": "17px",
  "--wsc-connectbutton-border-radius": "12px",
  "--wsc-connectbutton-color": "#414451",
  "--wsc-connectbutton-background": "#ffffff",
  "--wsc-connectbutton-box-shadow":
    "inset 0 0 0 1px #E9EAEC, 0px 2px 4px rgba(0, 0, 0, 0.02)",

  "--wsc-connectbutton-hover-background": "#F6F7F9",
  "--wsc-connectbutton-hover-box-shadow":
    "inset 0 0 0 1px #E9EAEC, 0px 2px 4px rgba(0, 0, 0, 0.02)",

  "--wsc-connectbutton-secondary-color": "#373737",
  "--wsc-connectbutton-secondary-background": "#F6F7F9",
  "--wsc-connectbutton-secondary-box-shadow": "none",

  "--wsc-connectbutton-secondary-hover-background": "#f1f1f3",

  "--wsc-primary-button-border-radius": "12px",
  "--wsc-primary-button-color": "#414451",
  "--wsc-primary-button-background": "#ffffff",
  "--wsc-primary-button-box-shadow":
    "0 0 0 1px #E9EAEC, 0px 2px 4px rgba(0, 0, 0, 0.02)",

  "--wsc-primary-button-hover-background": "#F6F7F9",
  "--wsc-primary-button-hover-box-shadow":
    "0 0 0 1px #D9DBDD, 0px 0 0 rgba(0, 0, 0, 0.02)",

  "--wsc-secondary-button-border-radius": "12px",
  "--wsc-secondary-button-color": "#414451",
  "--wsc-secondary-button-background": "#ffffff",
  "--wsc-secondary-button-box-shadow":
    "0 0 0 1px #E9EAEC, 0px 2px 4px rgba(0, 0, 0, 0.02)",

  "--wsc-secondary-button-hover-background": "#F6F7F9",
  "--wsc-secondary-button-hover-box-shadow":
    "0 0 0 1px #D9DBDD, 0px 0 0 rgba(0, 0, 0, 0.02)",

  "--wsc-focus-color": "#1A88F8",
  "--wsc-modal-box-shadow": `0px 3px 16px rgba(0, 0, 0, 0.08)`,
  "--wsc-body-color": "#414451",
  "--wsc-body-color-muted": "#9196A1",
  "--wsc-body-color-muted-hover": "#000000",
  "--wsc-body-background": "#ffffff",
  "--wsc-body-background-transparent": "rgba(255,255,255,0)",
  "--wsc-body-background-secondary": "#f6f7f9",
  "--wsc-body-background-secondary-hover-background": "#e0e4eb",
  "--wsc-body-background-secondary-hover-outline": "#4282FF",
  "--wsc-body-background-tertiary": "#F6F8FA",
  "--wsc-tertiary-border-radius": "13px",
  "--wsc-tertiary-box-shadow": "inset 0 0 0 1px rgba(0, 0, 0, 0.04)",

  "--wsc-body-action-color": "#999999",
  "--wsc-body-divider": "#f7f6f8",
  "--wsc-body-color-danger": "#FF4E4E",
  "--wsc-body-color-valid": "#32D74B",

  "--wsc-tooltip-background": "#ffffff",
  "--wsc-tooltip-background-secondary": "#ffffff",
  "--wsc-tooltip-color": "#999999",
  "--wsc-tooltip-shadow": "0px 2px 10px rgba(0, 0, 0, 0.08)",

  "--wsc-spinner-color": "var(--wsc-focus-color)",

  "--wsc-alert-color": "#9196A1",
  "--wsc-alert-background": "#F6F8FA",
  "--wsc-alert-box-shadow": "inset 0 0 0 1px rgba(0, 0, 0, 0.04)",
  "--wsc-alert-border-radius": "8px",
};


export default function App({ Component, pageProps }: AppProps) {
  return (
    <WagmiConfig client={client}>
      <ConnectWSCProvider customTheme={customThemeVars} >
        <Component {...pageProps} />
      </ConnectWSCProvider>
    </WagmiConfig>
  );
}
Wallet-like Interface
Another effective approach is to present users with a wallet-like interface where they can easily view the balances of their assets/tokens on both Cardano and Milkomeda C1. This interface includes buttons that enable effortless asset transfers in both directions.
Below is a screenshot demonstrating the user-friendly interface, allowing users to perform actions like selecting an asset and wrapping it into Milkomeda.
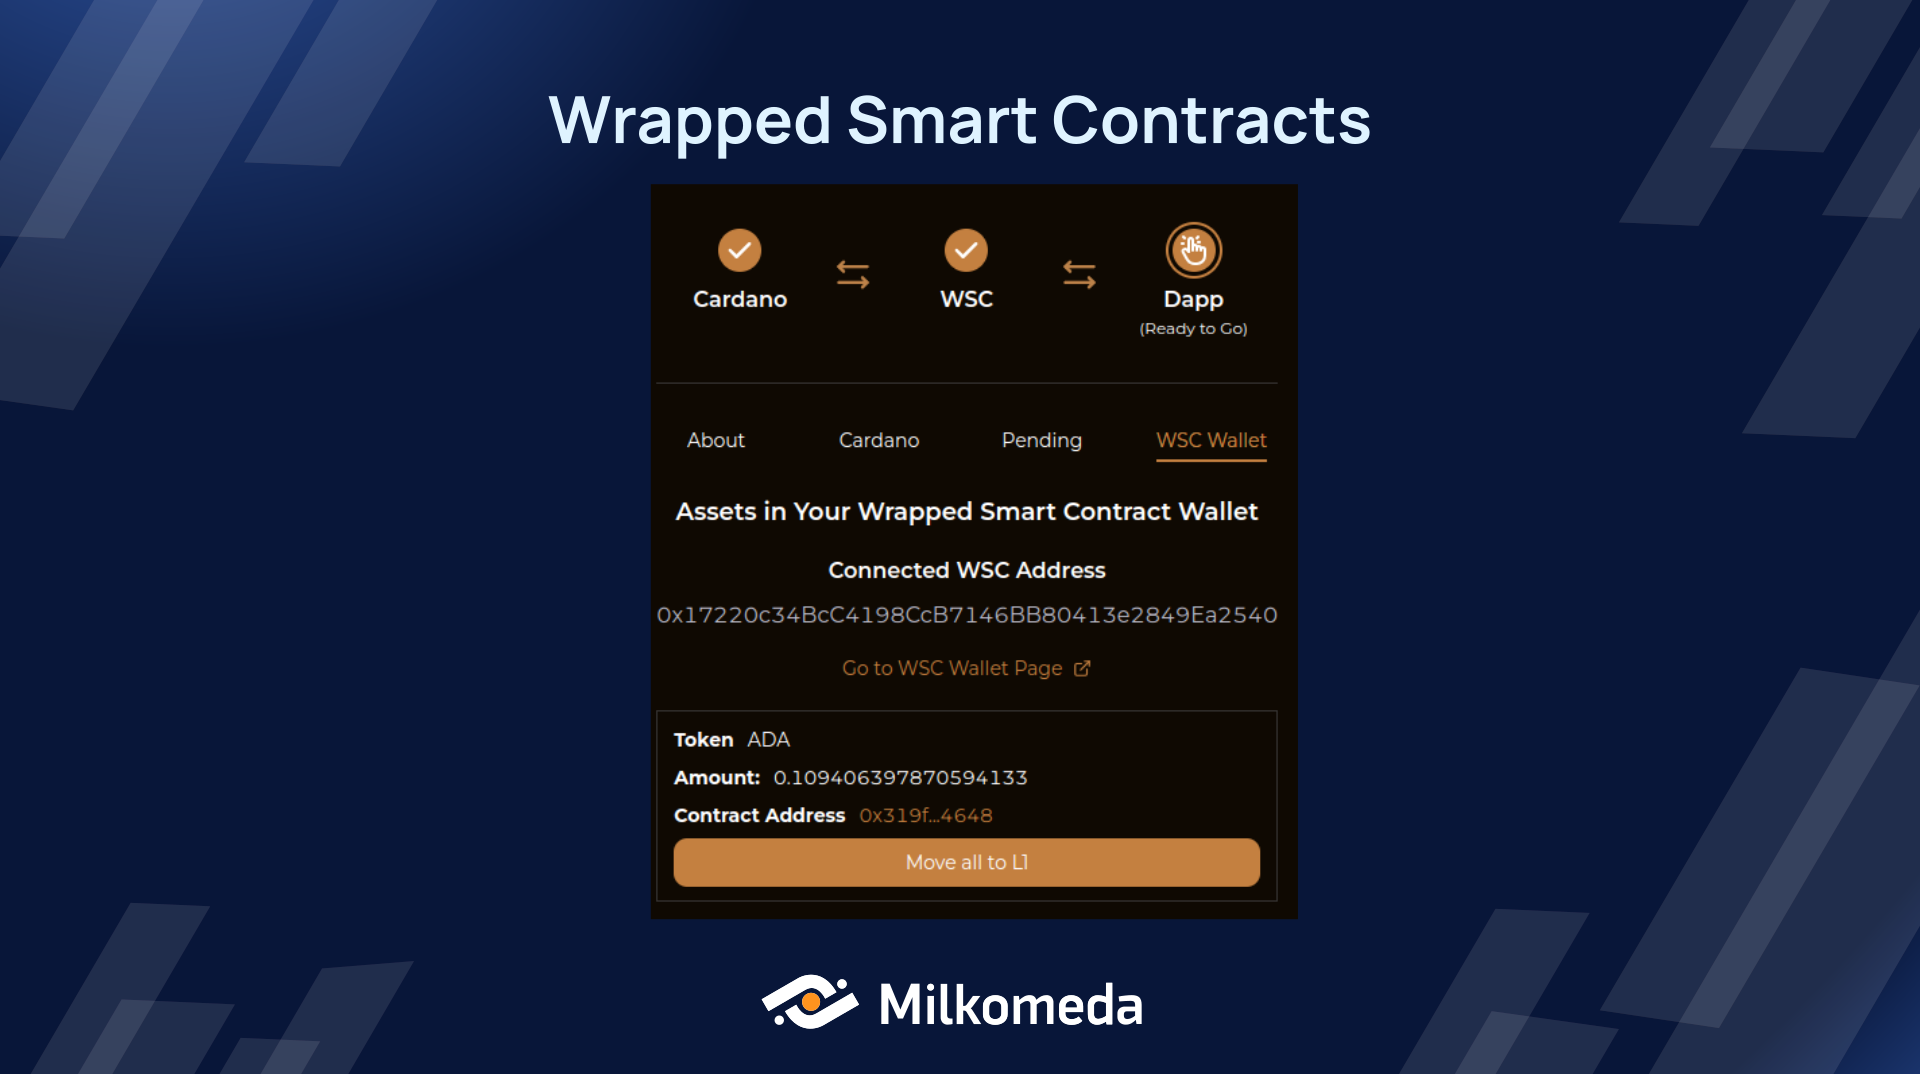
To load this interface the milkomeda-wsc-ui package provides WSCInterface, a React component designed to integrate wrapped smart contracts in a different way. It provides valuable information about wrapped smart contracts and allows users to conveniently check and wrap your Cardano tokens, keeping track of pending transactions and enables unwrapping of WSC tokens.
This simplifies the process of incorporating wrapped smart contracts in DApp by presenting users with an interface with the following tabs:
- About: Provides all the information about WSC to get better understanding about the process and interactions
- Cardano: Lists all cardano tokens of the linked L1 address and presents inputs and buttons to be able to wrap them (some tokens are not eligible, as they are not supported by the bridge)
- Pending: Lists pending transactions for wrap or unwrap transactions -- WSC Wallet: Lists all WSC tokens and presents inputs and buttons also unwrap them if they are supported by the bridge
Example:
import { WagmiConfig, createClient } from "wagmi";
import {
  ConnectWSCProvider,
  getDefaultConfig,
  MilkomedaNetworkName,
} from "milkomeda-wsc-ui-test-beta";

const client = createClient(
  getDefaultConfig({
    oracleUrl: "https://wsc-server-devnet.c1.milkomeda.com",
    blockfrostId: "preprodliMqEQ9cvQgAFuV7b6dhA4lkjTX1eBLb",
    network: MilkomedaNetworkName.C1Devnet,
    cardanoWalletNames: ["flint"], // , "eternl", "nami", "nufi", "yoroi"
  })
);


export default function App() {
  return (
    <WagmiConfig client={client}>
      <ConnectWSCProvider>
        <WSCInterface /> // place it wherever you want to
      </ConnectWSCProvider>
    </WagmiConfig>
  );
}
An example is available in the following repo
Summary
The "Milkomeda WSC UI" React library is designed to facilitate the integration of Wrapped Smart Contracts (WSC) into decentralized applications (dApps). The goal is to provide developers with an intuitive and user-friendly approach to incorporating WSC functionality into their projects. The Milkomeda WSC UI offers two integration approaches:
Integrated DApp Frontend which involves embedding user prompts directly into the dApp UI. When users interact with the protocol (e.g., performing a swap), a modal opens on top of the UI, guiding them through four main steps: wrapping, executing the action, approving token spending, and unwrapping back to the mainchain. The developers can use pre-configured components to enable connection to Milkomeda C1.
Wallet-like Interface where users can have a wallet-like interface in the DApp that displays their asset/token balances on both Layer 1 and Layer 2. This interface includes buttons for easy asset transfers in both directions. Users can view and wrap Cardano tokens in Milkomeda, track pending transactions, and unwrap WSC tokens.
To implement these integration approaches, developers need to install the Milkomeda WSC UI and WAGMI packages using npm. They should also set up specific configurations in their projects, including enabling top-level await and WebAssembly support in webpack. The Milkomeda WSC UI package provides React components like ConnectWSCProvider, TransactionConfigWSCProvider, and ConnectWSCButton, which are used to facilitate the configuration setup and interaction with WSC in the dApp.
With these integration options and the provided component library, developers can seamlessly integrate WSC functionality into their dApps, ensuring a smooth and visually appealing user experience for their users.